
BT Module vs Battery Monitor: Watts Best for Your Solar Powered System?
If you’re building out your own solar powered system, you’re going to want to include some way to monitor it. You’ll want to know what your panels are pulling in, what your battery is storing, as well as how much energy you are using on a daily basis. Keeping tabs on your solar powered system is like keeping track of a solar savings account. How else are you going to know what to do to keep the lights on and the fridge running when the sun disappears for a few days?
Renogy offers two methods for monitoring your solar powered system that are perfect for off-grid living:
●The BT (Bluetooth) Module attaches to your charge controller to measure the power coming from the panel and going to the battery. It connects wirelessly to your smartphone via the Renogy DC Home Appso that you can see, and track, what’s going on with your system.
●The 500A Battery Monitor connects to a wired LCD display screen that can be displayed inside your RV or off-grid cabin and provides the most accurate charge status of your battery.
BT (Bluetooth) Module
These methods have their pros and cons, and today we’re going to discuss each so that you can better decide which is right for you. Or, maybe you’ll decide, like us, that a combination of both is best for you. Check out our product review video below to see these components in action.
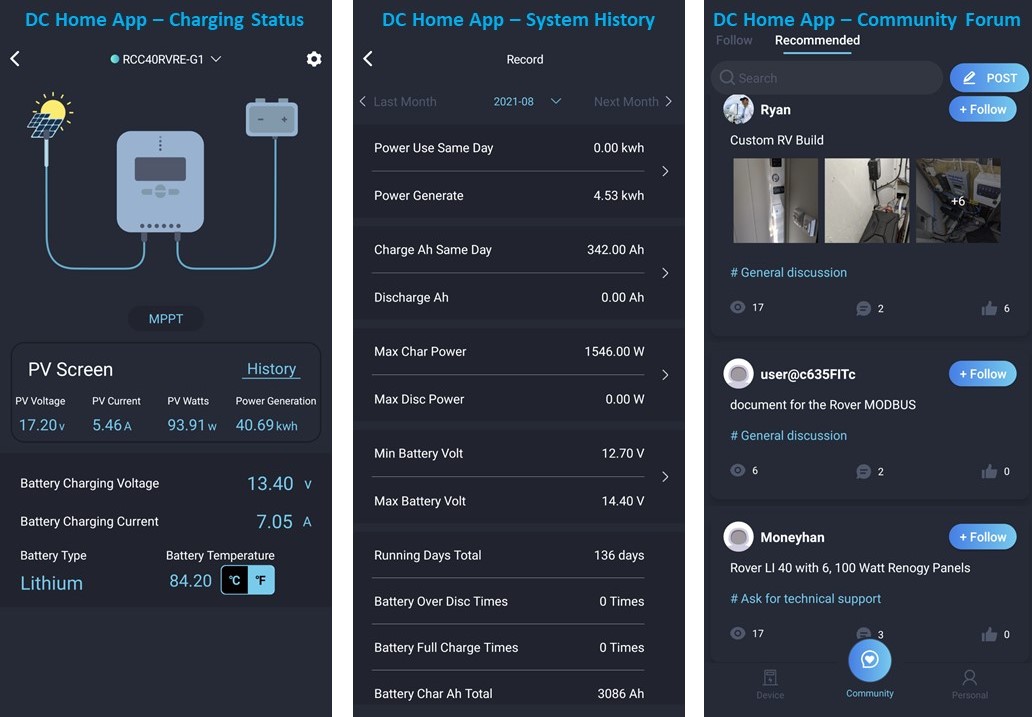
Let’s start with the BT Module. This is the less expensive option of the two we’re looking at today, at about $40. Not all charge controllers offer this module as an add-on option, so check the specifications to make sure that the unit you’re considering offers it. We use the Rover Elite 40A Charge Controller with MPPT, and we’ve been really pleased with its functionality and performance along with the BT-2 module. Note: If you chose a different Rover model, it may be compatible with the BT-1 module. With this BT Module and the DC Home app connected to your charge controller, you have access to a great deal of information. You can:
● Track voltage, amps, and watts from the panels and see how the MPPT boost is affecting your system.
● Get a history of your system to track total kilowatts generated, month to month data, as well as total running days, the number of times your battery has been overcharged or discharged, and more.
● Access the active Renogy community to gain assistance and share insights about your off-grid system -- a great way to connect with others who share similar values and can help solve any issues.
● Enter contests to win prizes from Renogy. We won their 2021 Earth Day Challenge!
How to Install
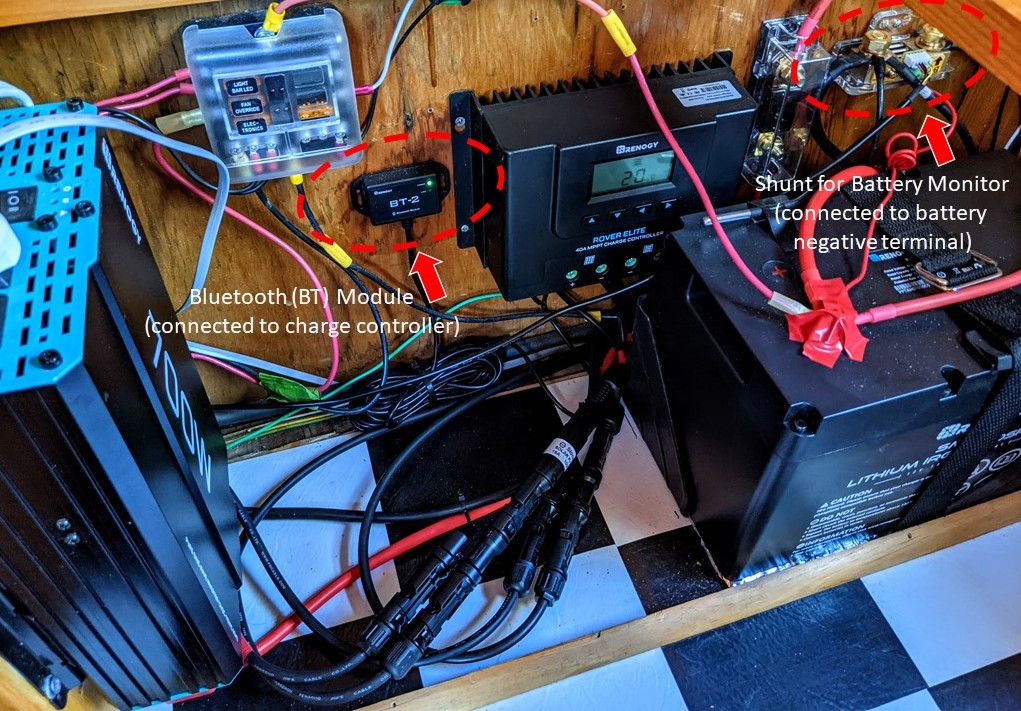
Anyone who can use double sided tape can install this BT-2 Module, simply stick or screw it to the wall, plug it into the charge controller and download the DC Home App (free) from wherever you get your apps. Once your app is running, make sure the Bluetooth setting on your phone is on, and the app will connect with your module automatically.
Why We Love it!
The BT Module with DC Home App shows what’s happening on the panel side of your system. You can:
● Get a great deal of information in one easy to use app.
● Use it from anywhere within your camper or cabin, or even just outside of it.
● Find the best location for your portable panel by moving the panel around until you see the highest wattage coming in real-time.
....and one other helpful hack that we’ll share later on that helps us determine the load on our system, so stick with us!
What this component lacks is the ability to know the most accurate charge status of your battery, which is where the 500A Battery Monitor comes into play so that you can keep track of that precious solar savings account.
Battery Monitor
All deep cycle batteries are rated in terms of amp hours, and the 500A Battery Monitor offers the most accurate way to measure the real-time status of your battery. Once it is calibrated correctly, which is very easy to do by following the instructions in the manual, it measures the amp hours into and out of your battery (or battery bank). It does this by measuring the voltage difference between the negative and positive terminals via the battery monitor shunt. It sends all of the necessary data to the monitoring screen which is on a 20’ cord so that you can mount it in a convenient location in your RV, van, or off-grid cabin.
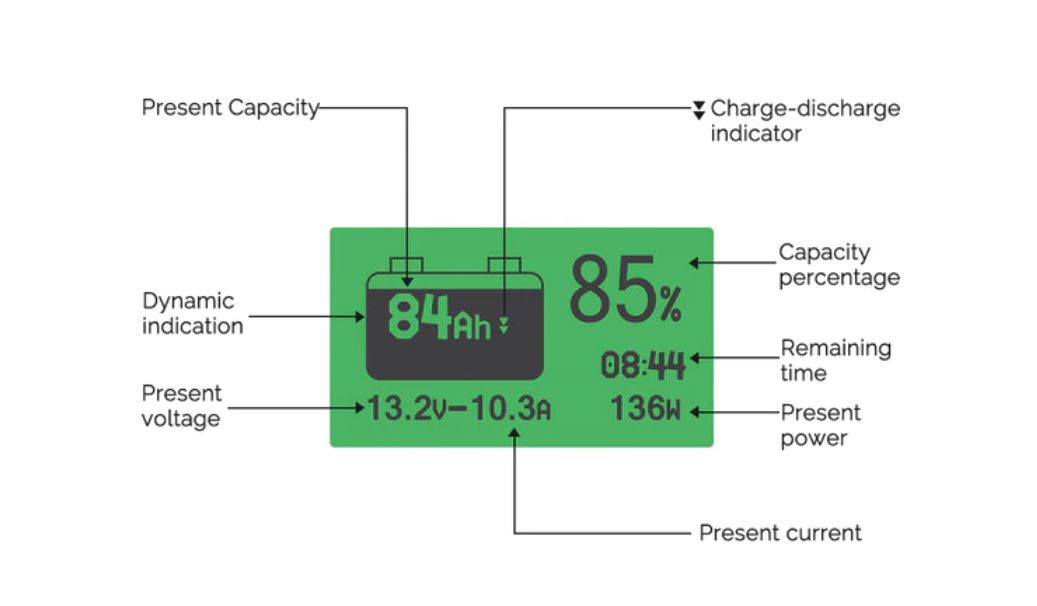
The Battery Monitor screen shows what’s happening on the battery side of your system, including:
● percentage of charge of battery
● voltage status of battery
● amps going into or out of the battery
● watts going into or out of the battery
● amount of time until the battery is fully charged or discharged (if all things above remain constant)
How to Install
While this monitor is slightly more complicated than the BT Module because you’ll need to wire in a shunt, it is still pretty straight forward if you follow the step-by-step wiring instructions in our installation video below (skip to 26:10 minutes if you’d like to go right to this part of the video).
One thing that seems to confuse some consumers of this product is the backlight on the monitor, but it’s very easy to use. To turn on the backlight, push the top button until the green light illuminates the display. It will flash while the system is charging, and stay solid while full or discharging. If you don’t like the light on, or it’s too bright at night, just hold the top button down for about 3 seconds and the light will shut off.
Why We Love It!
This small and simple gadget is so helpful and easy to use, it’s almost the best deal you can get for under $100. We added this monitor to our system when we did our upgrade and we have no idea how we have lived without it for all these years. It has taken the guesswork out of the charge status of our battery -- no complicated conversions to make between voltage and percentage of charge, etc. It makes keeping tabs on our solar savings account a cinch!
Lacking a Load Terminal on your Inverter?
Ok, we promised we’d tell you a fun hack to figure out your load. Our system is so small that our Renogy 700W Pure Sine Wave Inverter doesn’t come with a load terminal, and we didn’t need to upgrade our inverter because it was more than enough for our energy needs. By using these two components in tandem, we can easily calculate the approximate load on our system. Here’s how we do it…
When running a load (the total amount of your energy usage) at night without any solar input, you just look at the watts going out of the battery on the monitoring screen to know your load, simple enough. But if you’re using appliances during the day, when you’re also pulling in energy from the panels, you’ll need to subtract, or add, what you’re using from / to what you’re generating.
Open up the DC Home App so you can see the watts coming into the system from the panels. Then, on the battery monitor screen, note the watts going out of, or into, the battery while running appliances. The difference between what you’re generating and what’s going into or out of the battery is your actual load.
Let’s say it’s cloudy and you are collecting 75W from the 200W solar array, and the battery is discharging at 50W, this means that your load is 50W greater than what you’re generating, so add those two numbers together to get your total load of 125W. If you’re pulling in that same 75W and the battery is going up by 50W, you’re generating more than what you’re using, so subtract 50W from 75W and your total load is 25W. It’s that simple!
We love having both of these components integrated into our system and highly recommend using each for their specific use. For less than $130, you can easily figure out what’s going on with all aspects of your system. It’s super helpful for troubleshooting any situations that might arise with your system. And, don’t forget to use our “canlife” promo code at checkout to save 10% off most Renogy products. As they say, knowledge is power…and in this case, it’s sun power!
If you have any questions, hit us up via our website, YouTube channel or via social media! We truly love helping people figure out how to go solar.

In 2012, Shari Galiardi & David Hutchison left behind careers and a comfortable home in North Carolina to travel with the vintage camper trailer they lovingly restored, outfitted with solar, and named "Hamlet." What began as a short break from careers and responsibility quickly turned into a love affair with roadlife. They have parlayed their higher education backgrounds, desire for life-long learning, and thirst for adventure travel into writing, photography, video production, and public speaking gigs from coast to coast. Known to their friends as simply Shari & Hutch, you can learn more about their full-time, solar-powered adventures on their website at freedominacan.com. Or, follow them on Facebook, Instagram, and YouTube as “Freedom in a Can, LLC.”
See other related articles at Renogy:
Solar Panels Maintenance Best Practices And Costs
A Guide to Installing Solar Panels On Van Or RV
Solar Panels 101: A Beginner's Guide
The Ultimate Guide To DIY Off-Grid Solar Systems
Do solar panels increase home value
How efficient are solar panels
How Many Solar Panels Do I Need


