
Off-grid solar installations in the middle of nowhere are often the first thing people think about when they think of going solar. While it’s definitely not for everyone, DIY off-grid solar can be a great solution for those living in a remote area without reliable and affordable access to the grid, want to live a self-reliant lifestyle without monthly utility bills, or have the ability to access power during a blackout.
Select Batteries for your Battery Bank
Select Your Solar Panels
Off-grid solar systems utilize batteries to store energy produced from solar panels. Because you’ll be relying solely on your own solar installation to cover all your energy needs, systems must be sized and designed to fit a variety of needs throughout the year, especially in the winter when there are fewer sunlight hours. Off-grid systems are great for those wanting to go the DIY route since you’re not connected to the grid. But you’ll definitely want to educate yourself before you dive in. The key components of every off-grid solar installation include solar panels, charge controllers, batteries, and inverters. We highly recommend taking the time to read up on all the different components, as well as how to plan and size your system to be efficient for years to come.
In this guide, we’ll help you navigate calculating how much energy you’ll need to produce, how to store that energy, and how to select your components, from solar panels to inverters.
Calculate Your Power Load
One of the most important parts of going off-grid is calculating your energy needs. This is because you won’t be able to tap into the electric grid, but rather relying solely on your own system. Having an accurate understanding of your energy needs will give you a better idea of the costs and ensure you don’t under- or over-build a system.
The Renogy solar panel calculator is a great tool that makes it a quick and easy process to help determine your specific needs. The solar sizing calculator allows you to input information about your lifestyle to help you decide on your solar panel requirements. You’ll need to know what total watts your electronics will consume, how long you plan on running the devices, your charge controller efficiency, and average sun hours per day (taking into consideration those darker winter months).
Learn more about off-grid solar systems as well as sizing your system to best fit you and your home’s needs in the posts below.
- What Is Off-Grid Solar?
- Getting Started with DIY Solar Power
- Sizing Your Electric System
- How To Use Renogy’s Solar Calculator
 Select Batteries for your Battery Bank
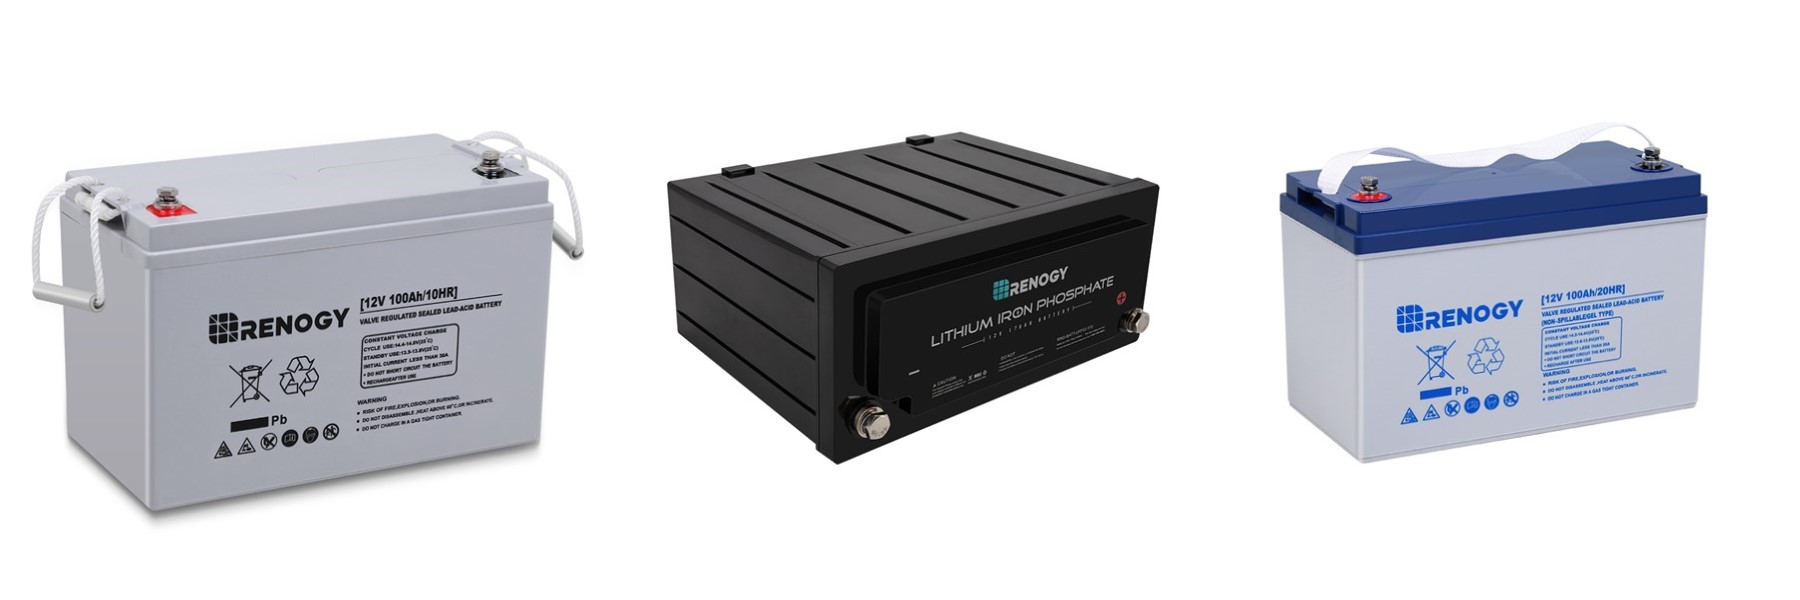
Batteries are a crucial component of off-grid solar systems. After all, how are you going to store all the energy produced from your panels? There is a range of deep cycle battery options that are ideal for solar applications, such as sealed and flooded lead acid and lithium ion batteries.
Flooded lead acid batteries are the cheapest battery option and are available in many big box stores. They also require the most maintenance. Flooded lead acid batteries contain a combination of a liquid electrolyte, and the liquid in these batteries must be carefully measured and maintained to ensure a healthy, long-lasting battery. They also emit gases, so it’s important that they are housed in a well-ventilated room.
Sealed lead acid batteries require little to no maintenance and are more efficient than flooded lead acid batteries. Contrary to flooded lead acid batteries, there’s no need to add water to the inside compartment. Although they are more expensive, they also have a longer cycle life.
There are two main types of sealed lead acid batteries: absorbed glass mat (AGM) and gel batteries. Gel batteries, which use silica to stiffen the electrolyte solution in the battery, tend to have lower charger rates and output than absorbed glass mat batteries. They also can’t handle as much current, meaning they take longer to recharge. Gel batteries have a greater lifespan than AGM batteries. AGM batteries are the cheaper of the two and they also offer a better temperature range.
Lithium iron phosphate batteries are the most advanced and expensive battery type. For those who place a premium on efficiency and portability should consider lithium iron phosphate batteries. They are compact and lightweight, have an extremely long cycle life, and high discharge and recharge rates. They also require little to no maintenance. Lithium batteries typically have a lifespan of at least 10 years and lose less capacity when idle than other battery types.
When it comes to choosing a battery for your off-grid system, we typically recommend lithium batteries because of their high efficiency and lifespan.
The amount of battery storage you need is based on your energy usage, so again refer to your results from the Renogy solar panel calculator. To give you an idea, a battery capacity of 4 to 8 kWh is usually sufficient for an average four-person home. To learn more about the pros and cons of each battery type, how large of a battery bank to have, and the different options available from Renogy, read the follow posts.
- Sizing Your Battery Bank for Your Solar System
- Do I Need Deep Cycle Batteries for My Solar Installation?
- Top Selling Renogy Batteries
Select Your Solar Panels
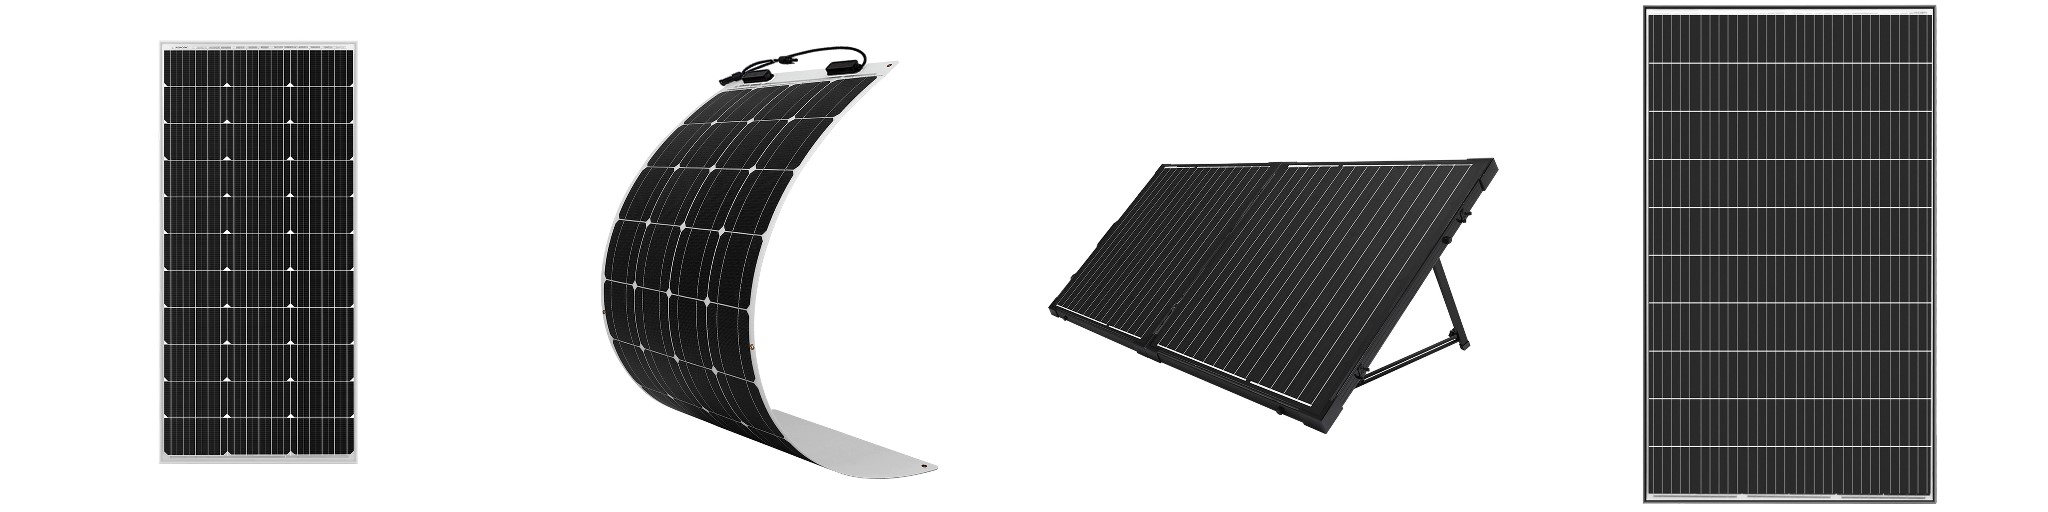
When it comes to actually collecting energy from the sun, that’s where solar panels come in. There are a few different solar panel options available to choose from.
Monocrystalline vs. Polycrystalline Panels
Choosing between monocrystalline and polycrystalline panels is one of the first steps to take when shopping for solar panels. Polycrystalline panels are light blue in color, and they are less energy and space efficient than monocrystalline panels. On the plus side, they are also the cheaper option. Monocrystalline panels, which are darker in color, are more space and energy efficient. Keep in mind that with the added efficiency comes a higher price tag.
Portable vs. Roof Mounted Panels
Rigid, roof mounted solar panels are the most common solar panel type and durable solar panel type. They are also ideal if you have consistent energy needs and want to be able to charge your battery bank at the flip of a switch. If you are looking to mount your solar panels on a non-flat roof, flexible solar panels are the way to go.
On the other hand, portable solar panels are perfect for those who may not be ready to mount solar panels on their roof, have limited surface area to mount panels, want to generate solar on multiple applications, such as on your RV and your home, or have smaller energy needs. One of the most popular types of portable solar panel systems are folding suitcase panel kits. Folding suitcase panel kits are lightweight, easy to handle, and can be set up on the ground and angled for maximum efficiency.
12V vs. 24V Panels
Solar installations be built out as 12, 24, or 48 volt systems. Most RV’s and boats have 12V battery banks, so people usually stick with the 12V panels in order to be compatible with those. You may consider a 24v solar panel system if you have high energy needs. If your energy needs are about 1 to 3 kW, we’d recommend a 24 volt system. If your energy needs are above that, you’ll want to install a 48v system. Having a higher voltage panel system can save you money in the long run as you need less charge controllers and can use thinner cables for the same amount of power.
Solar panels are also available in flexible and rigid forms. Flexible panels weigh less than the rigid solar panels and can be installed directly on the roof of your RV or van. Rigid panels, which are more typically durable, can also be mounted to tilt, which makes their solar energy collection more efficient. If you’ll be mounting panels to your roof, you’ll want to take into consideration the condition of your roof and how old it is. If it’s nearing the end of its life, you’ll want to replace it before going solar.
Learn more about all of this and more in the following posts about solar panels and how to select the right one for you.
- How Solar Panels Work: A Breakdown for Beginners
- How To Choose The Right Solar Panels for Your Lifestyle
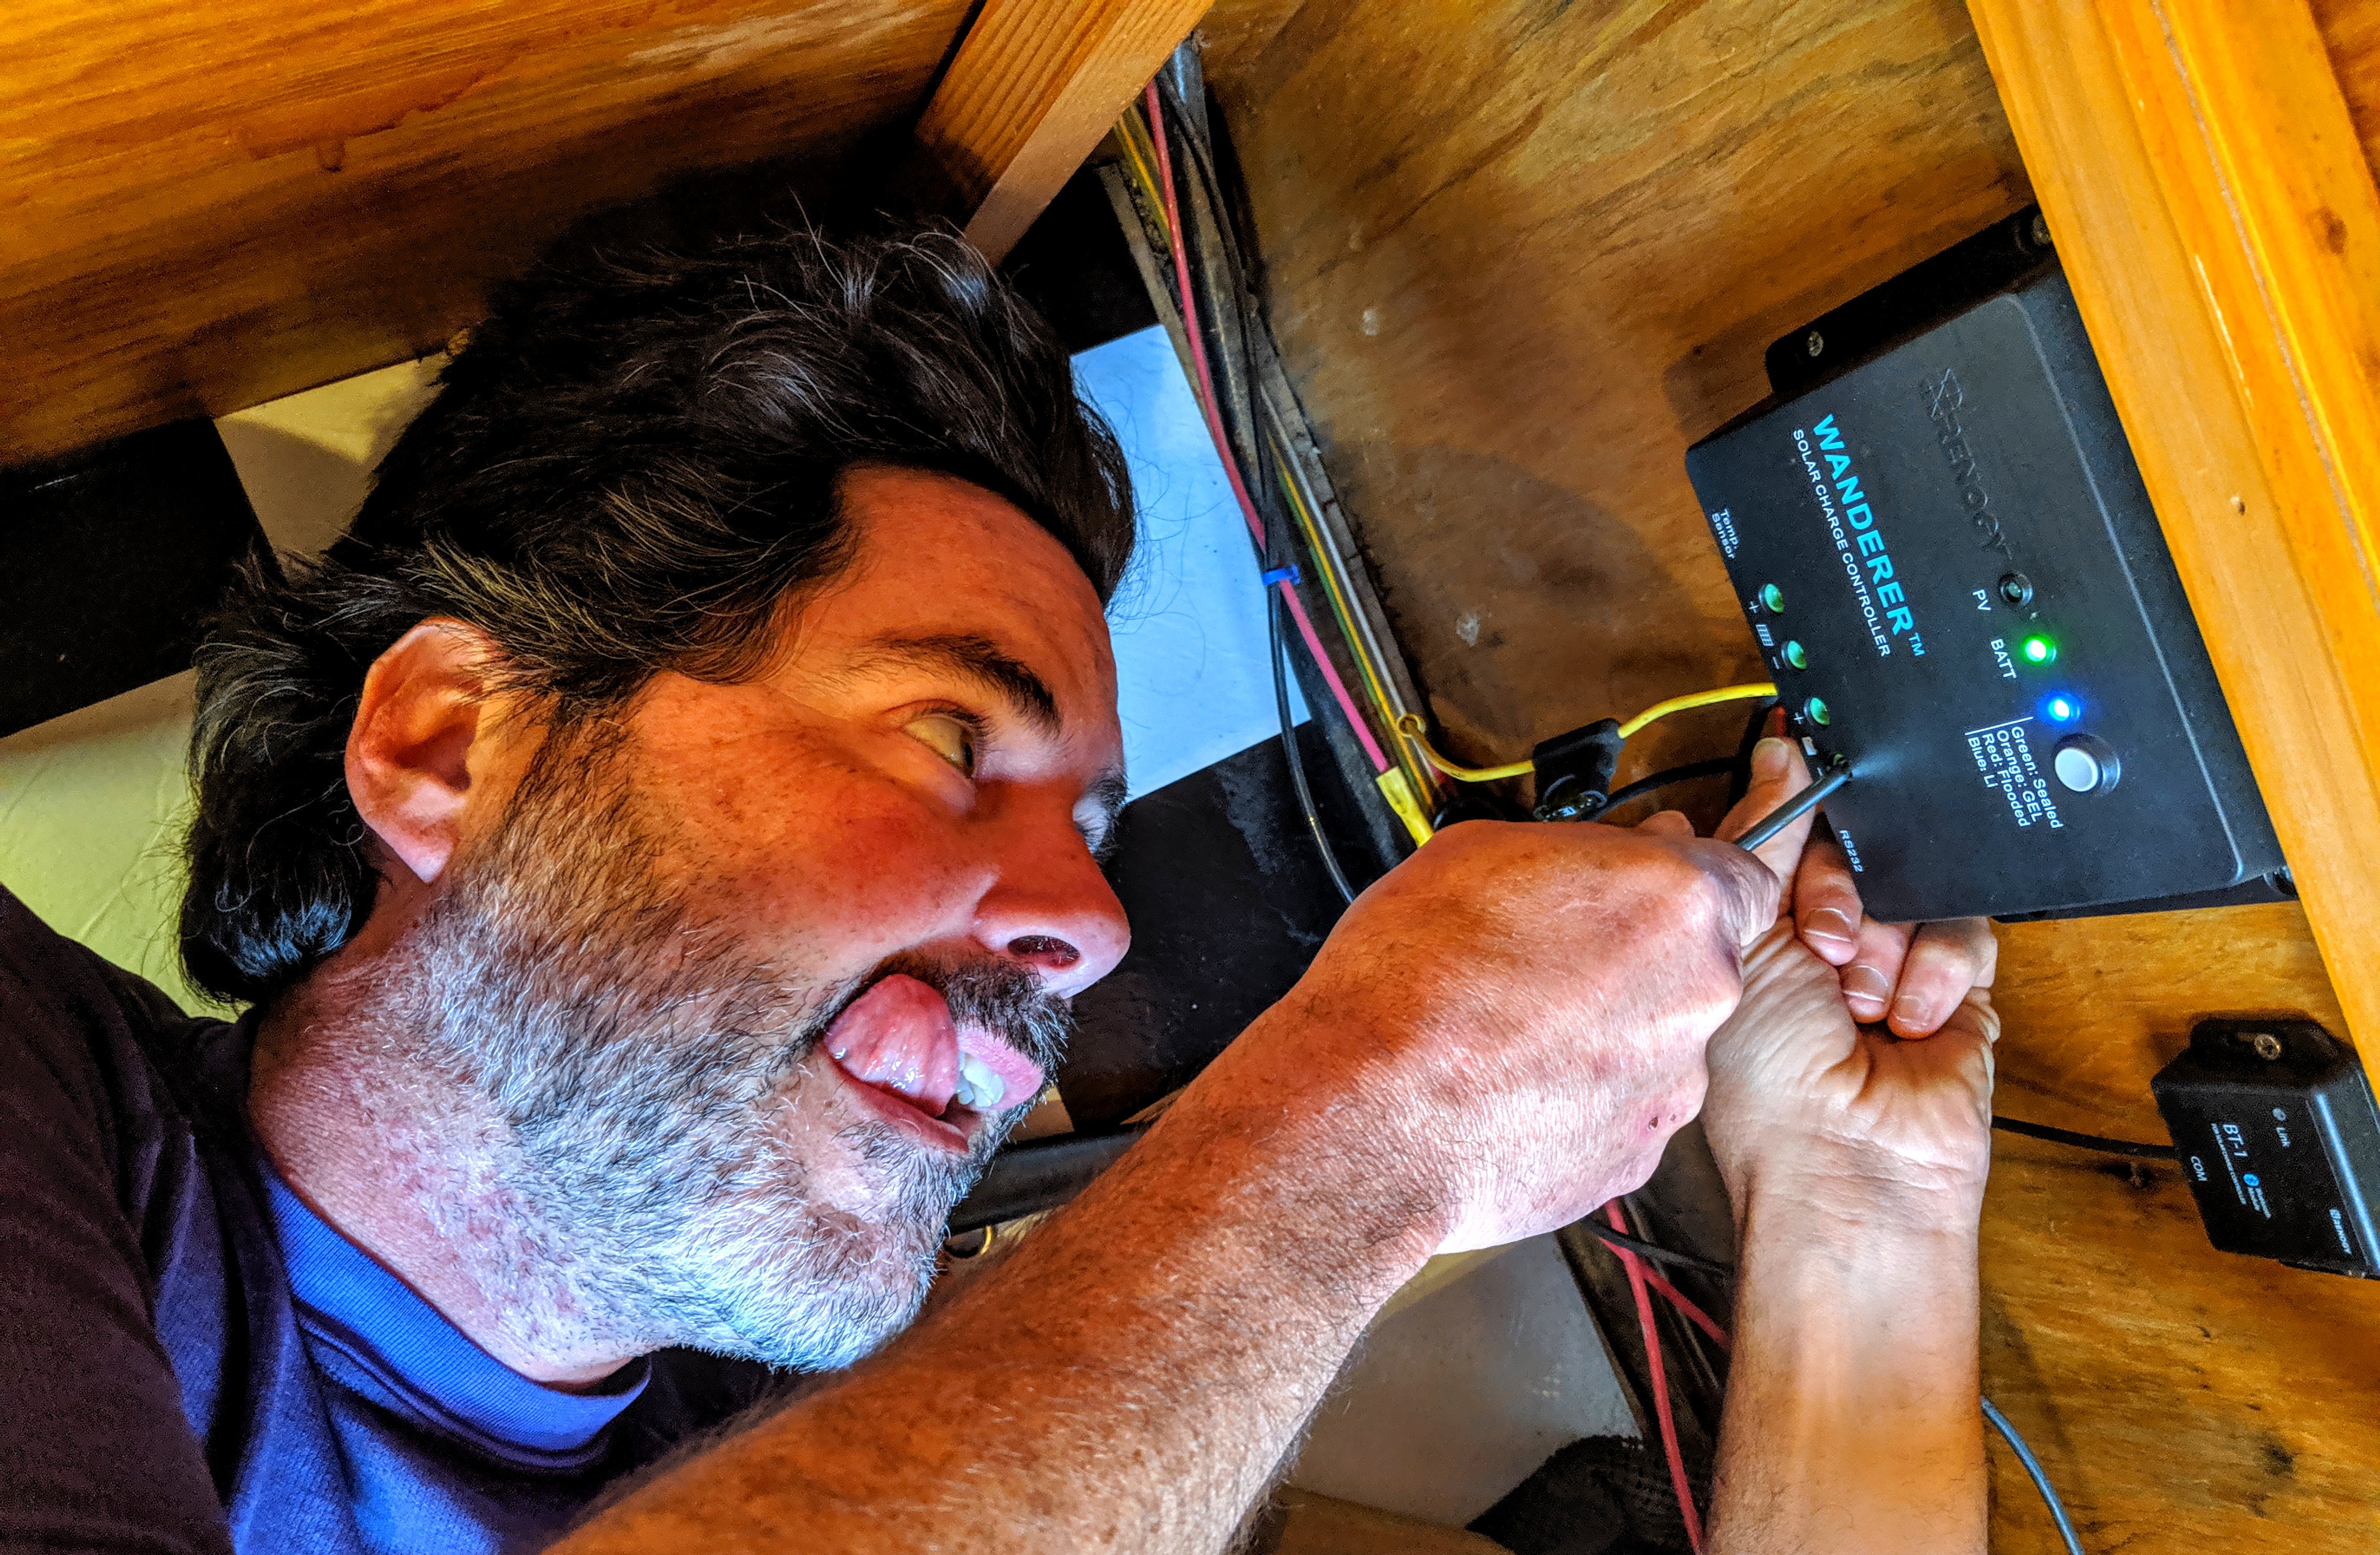
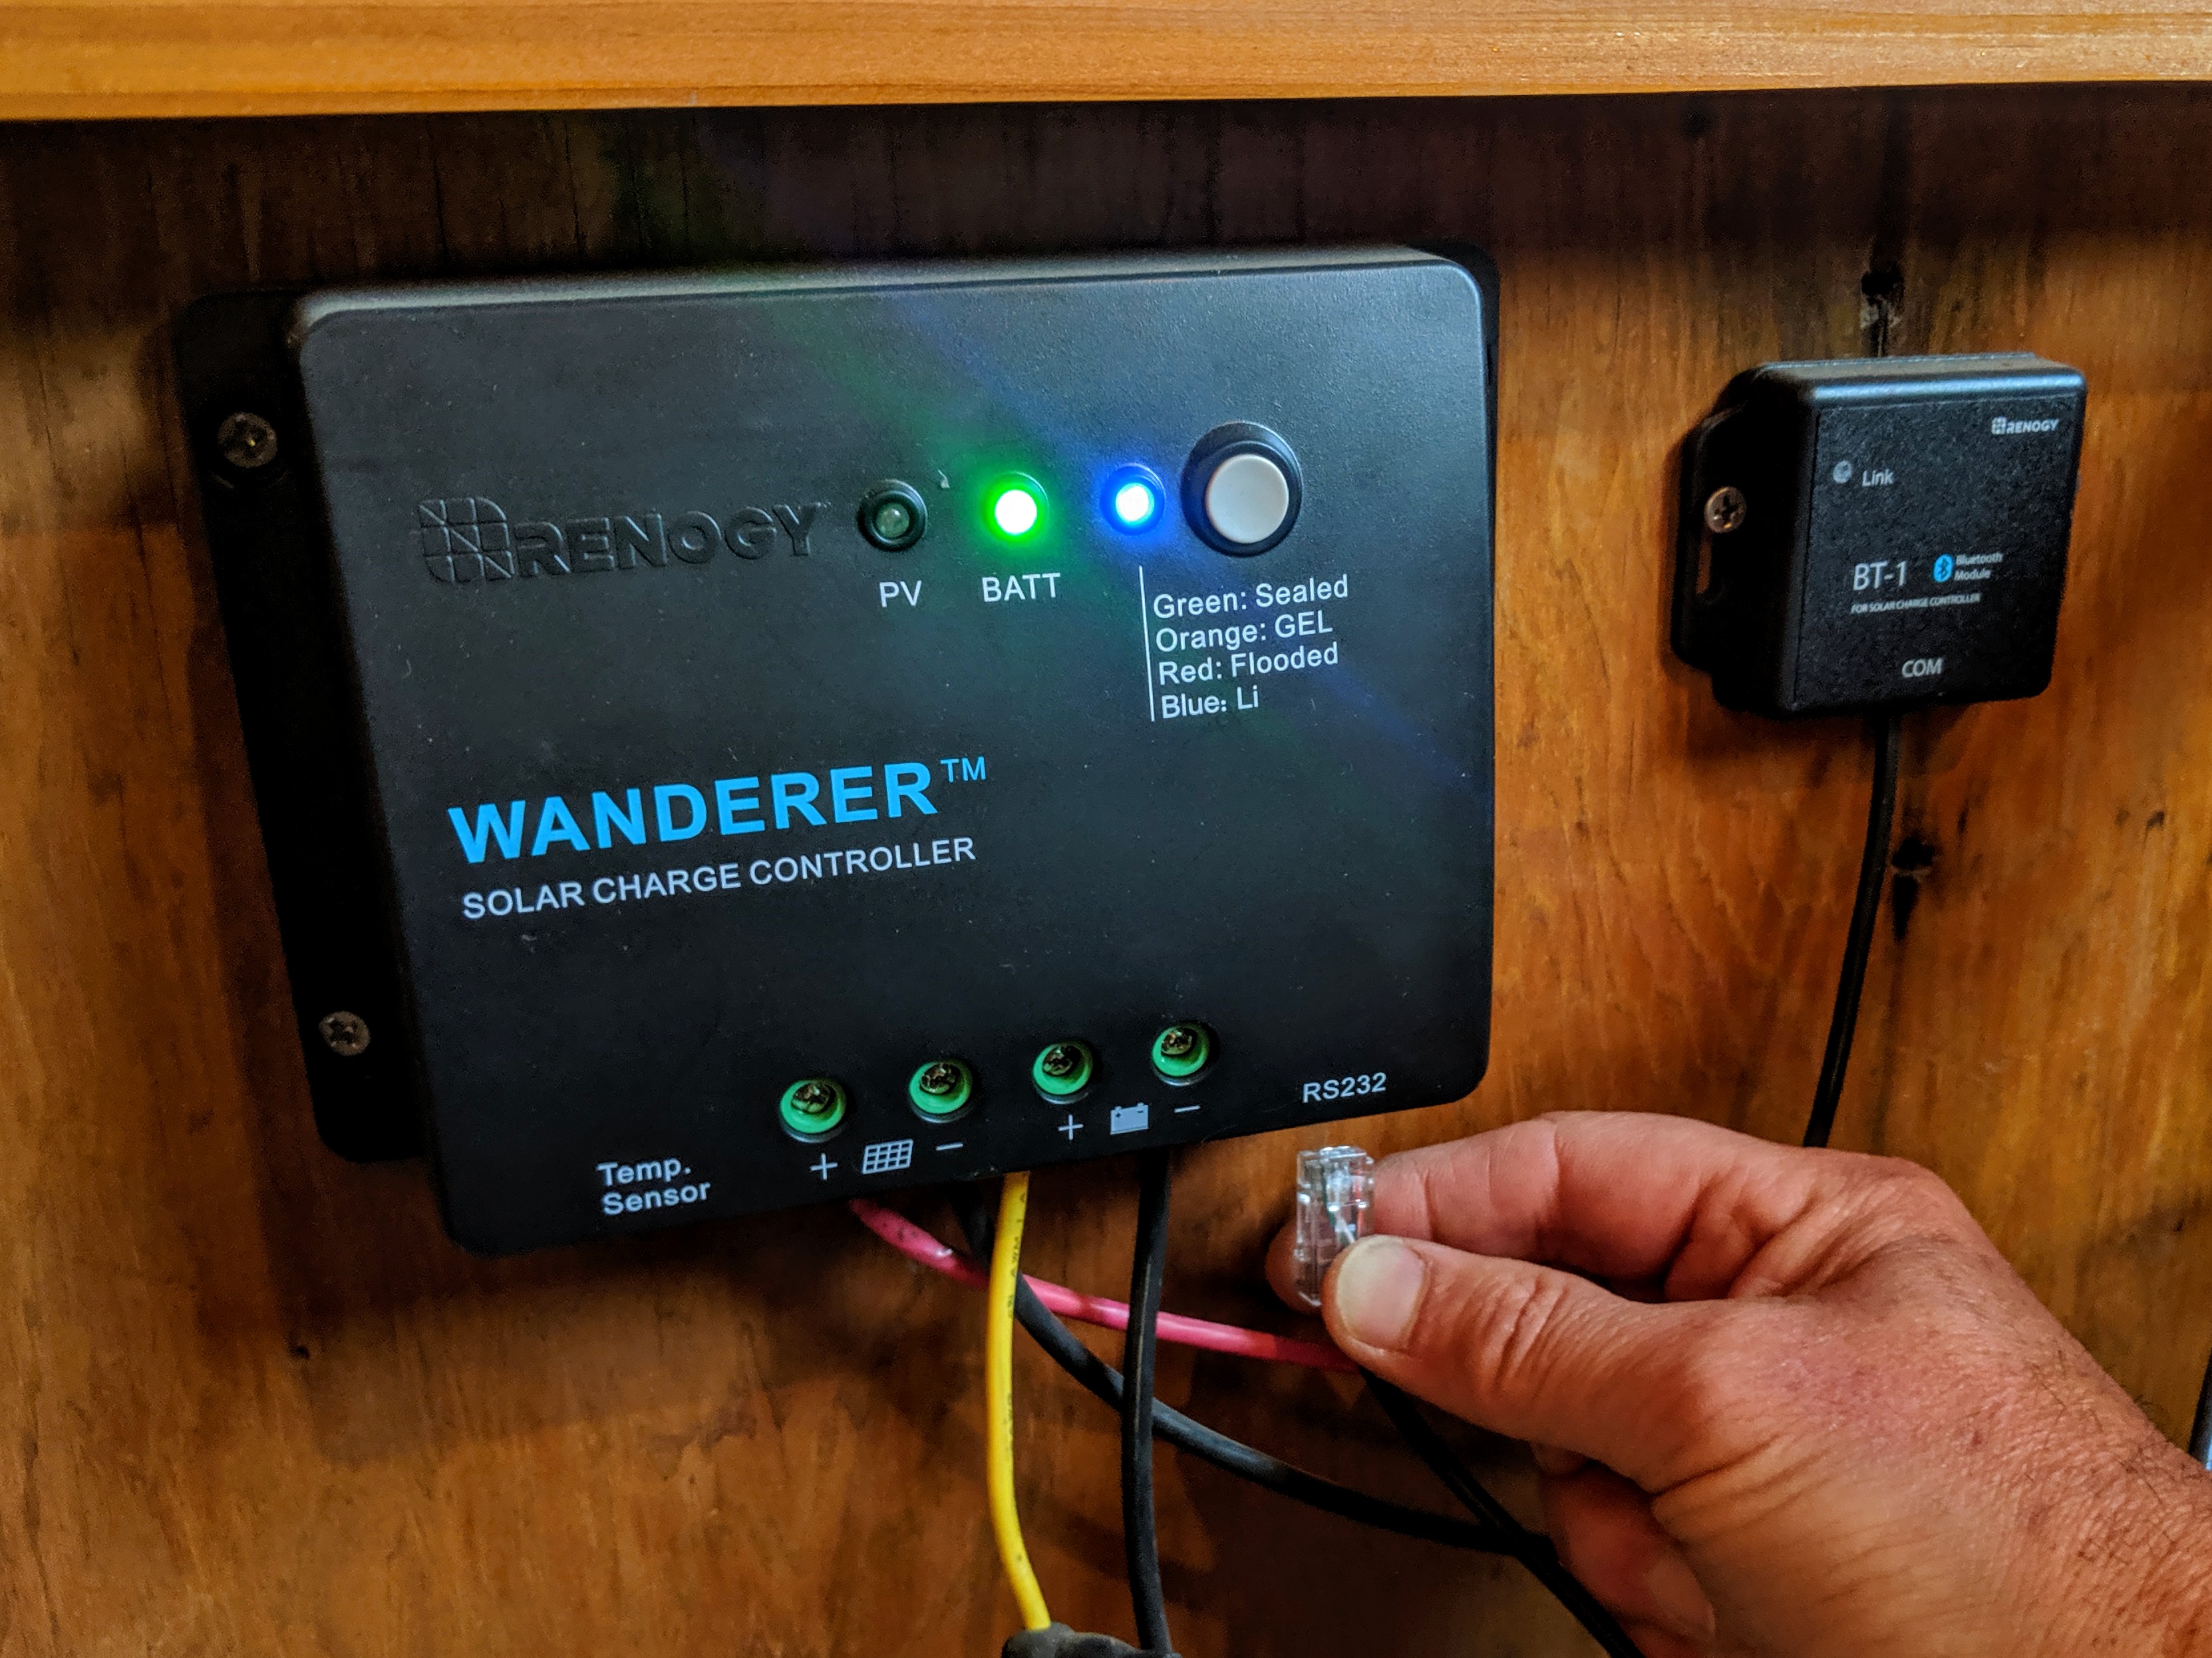
Select A Solar Charge Controller
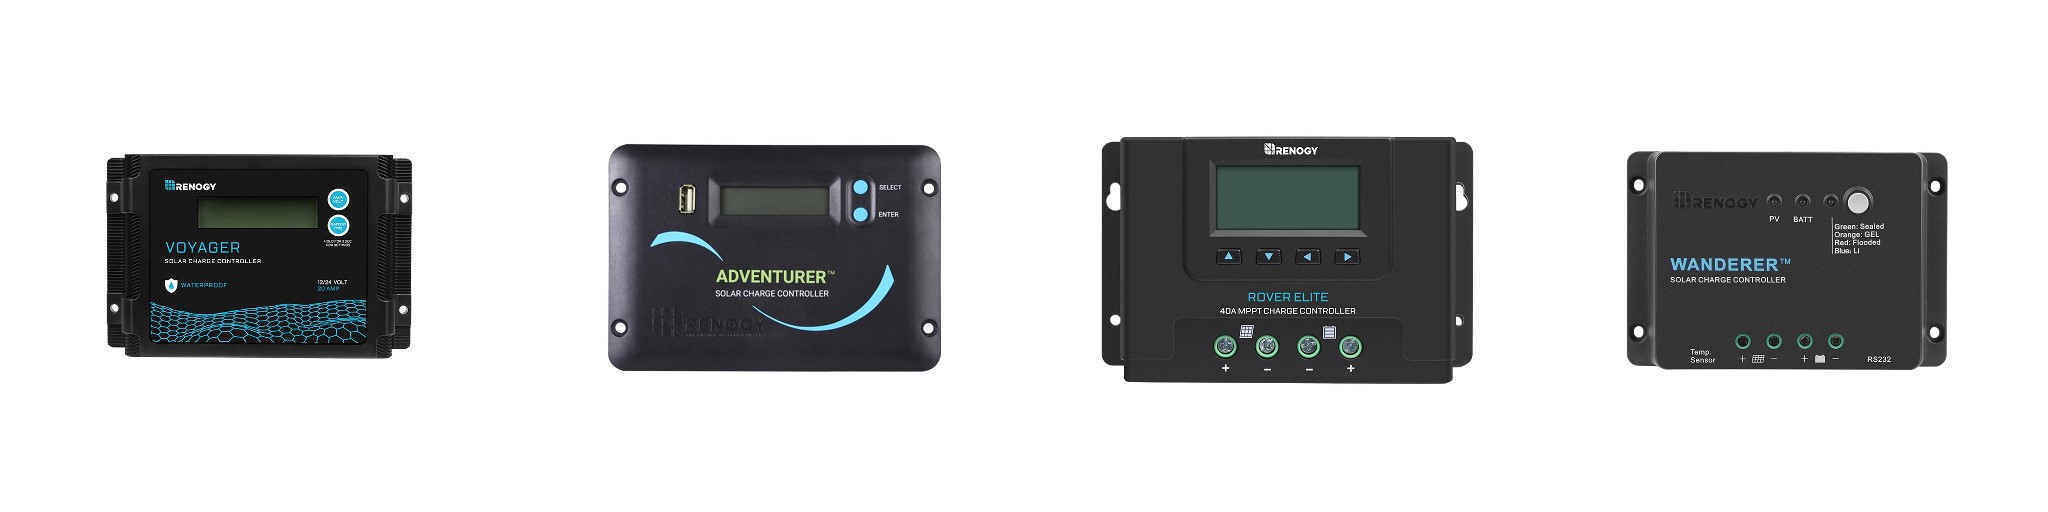
Charge controllers are another crucial component of your system and are recommended with every solar panel larger than five watts. They sit between the energy source and storage and perform the essential role of preventing any overcharging of batteries by limiting the amount and rate of charge to your batteries.
Additionally, charge controllers shut down your system if the stored power falls below 50 percent capacity and charge batteries at the correct voltage level. This helps preserve the life and health of the batteries in your battery bank.
There are two types of charge controllers to consider: Pulse Width Modulation (PWM) controllers and Maximum Power Point Tracking (MPPT) controllers. PWM charge controllers are cheaper and ideal in smaller applications. They’re an older technology and are cheaper, but they are also less efficient than MPPT charge controllers. MPPT controllers are the most efficient controller option, ideal in large applications, and are the most expensive option. Both are widely used, have similar lifespans, and preserve the life of your batteries. We typically recommend using MPPT controllers in an off-grid system because of their increased efficiency levels.
Lean more about charge controllers in the posts below.
- How Many Charge Controllers Do I Need?
- Charge Controller Sizing for Your Off-Grid System
- What to Know About MPPT Solar Charge Controllers
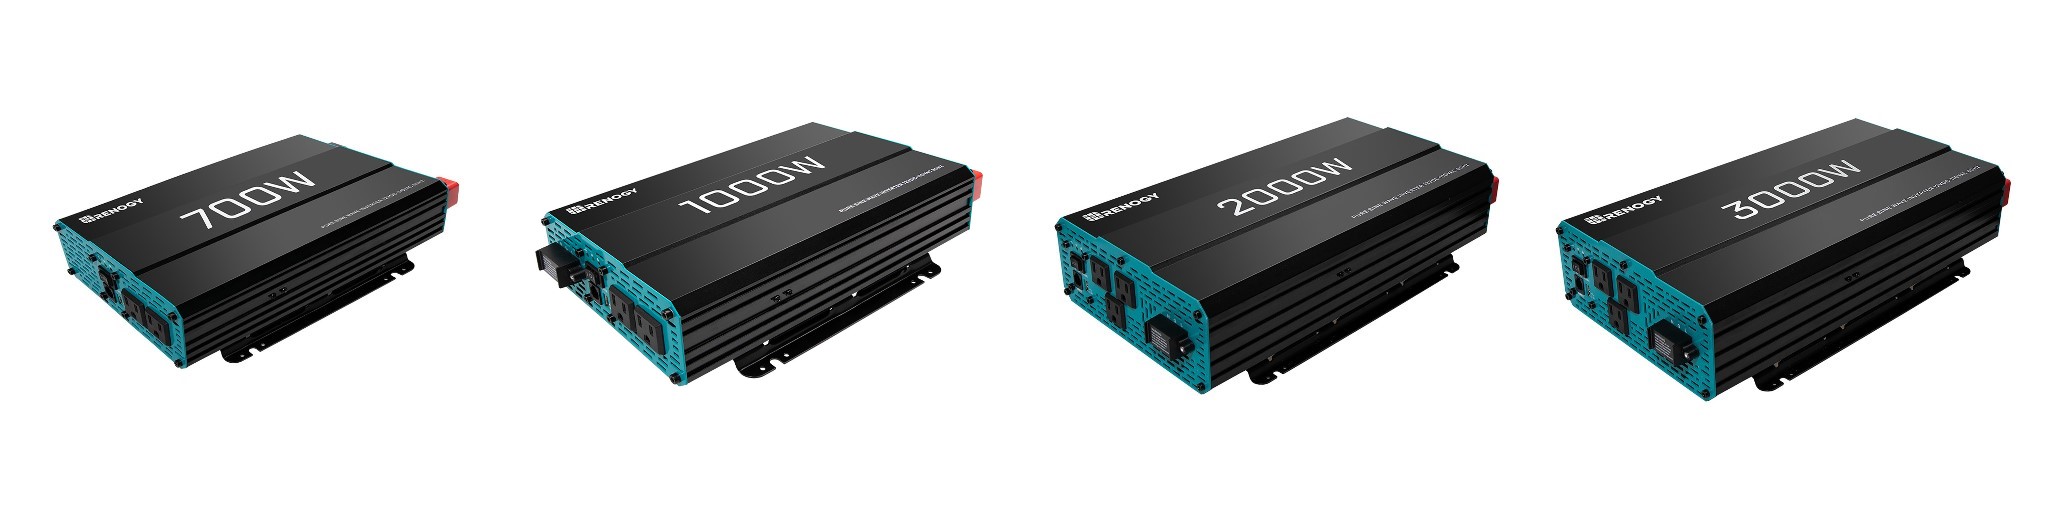
Select An Inverter
Inverters are the final, crucial component to consider when piecing together your solar installation. Inverters turn DC power produced from your solar panels and stored in your battery into AC power. An inverter is necessary to power the common appliances found in your home or RV, from TV’s to microwaves. When shopping around for inverters, you’ll quickly learn there is not a one-size-fits-all approach.
There are two main inverter types: pure sine wave and modified sine wave inverters.
Pure sine wave inverters are capable of producing smooth, quiet, and reliable electricity to operate appliances and electronics without any interference. Like its name suggests, pure sine wave inverters produce current in a pure sine wave shape. Renogy sells a range of pure sine wave inverters of varying capacities to fit your solar installation and your energy needs. Renogy inverters also provide overload protection for both DC input and AC output to prevent damage to the components and the unit.
When looking at the waveform from a modified sine wave inverter, it has a stair-step, square pattern, where the polarity is flipped back and forth. Because of the choppiness of the wave pattern, modified sine wave inverters can negatively affect more delicate, sensitive equipment. If you have medical equipment you need to power, such as a CPAP machine, we recommend using a pure sine wave inverter. In many cases, you’ll hear a hum with devices attached to a modified sine wave inverter.
What can I run with a modified sine wave inverter?
Modified sine wave inverters can be used in simple systems without sensitive electronics. If you’re running an appliance that does not have an AC motor and isn’t a delicate piece of medical equipment, you may be fine with a modified sine wave inverter. Old tube tvs, water pumps, and phone chargers usually operate ok with a modified sine wave inverter.
Appliances like refrigerators, microwaves, and compressors that use AC motors won’t run as efficiently on a modified sine wave inverter. Some fluorescent lights will also not operate quite as bright, and some may buzz or make humming noises.
Review the posts below to learn more about different types of inverters, what to look for when shopping, and what size inverter to purchase for your system:
- What is the Best Off-Grid Inverter?
- What are the Different Types of Solar Inverters?
- Benefits of Pure Sine Wave vs. Modified Sine Wave Inverter
- How to Wire an Off-Grid Inverter
- Selecting a Solar Inverter for your Off-Grid Solar Installatio
Put It All Together
Solar is definitely becoming more popular among homeowners and travelers alike, and it is easy to see why. There’s a lot that goes into going solar, from sorting through technology options to handling permitting, but thanks to a growing number of solar panels kits, going solar on your own has never been easier.
If you are interested in going off-grid or living a remote or mobile lifestyle in a van or RV, and have the time and energy to dedicate toward a solar project, DIY off-grid solar can be a great way to meet your energy needs, be energy reliant, sustainable, and save money. Plus, if you live a lifestyle without accessible, reliable, and affordable access to power, off-grid solar is often the best way to meet those needs and live your dream life.
We hope this guide has answered your big questions about going off-grid. Taking into consideration the different solar components, properly sizing your system, and making a plan for the entire installation process, will help ensure you have a smooth transition to start collecting and storing energy from the sun.
SPECIAL CONSIDERATIONS FOR SELF-DRIVEN VS. TOW-BEHIND
RV’S:
Self-Driven (living space and engine in the same vehicle such as vans, buses, and motorhomes)
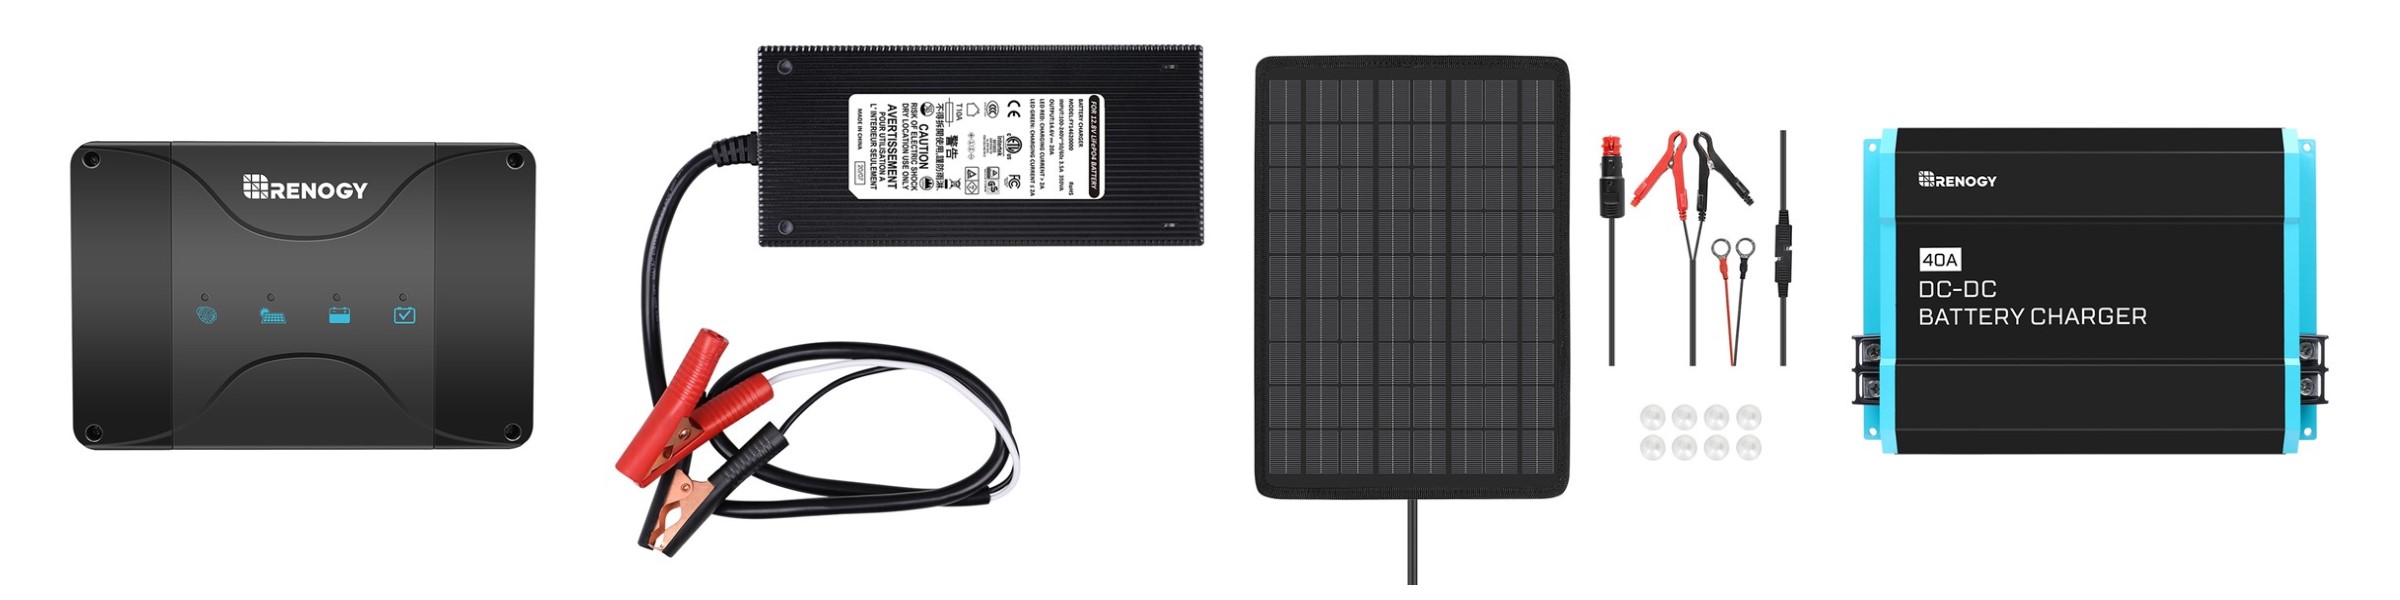
When you have an engine built into your living space, you can take advantage of the ability to charge your house battery without resorting to lugging around a gas powered generator. You can certainly use a battery isolator to charge while driving, but installing a DC to DC battery charger can greatly increase the charging voltage/amperage and greatly decrease the time it takes to recharge your house battery!
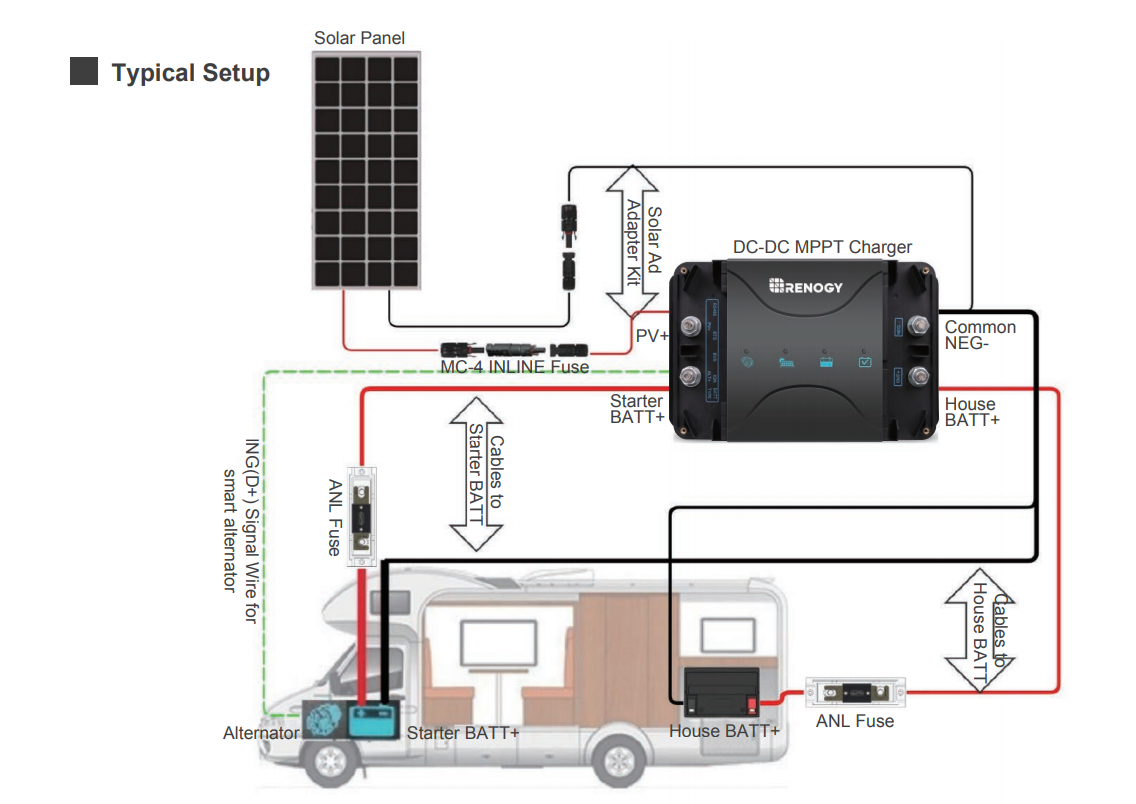
By installing a Dual Input DC to DC Battery Charger, you can charge your house battery even faster while driving down the road by simultaneously garnering energy from your vehicle’s starting battery/alternator (when the engine is running) and from your roof mounted solar panels. This product becomes both battery charger and charge controller, all in one. The added convenience here is that when the house batteries are full and the panels are still collecting solar energy, they will trickle charge your starting battery so that you won’t have to worry about not being able to start your vehicle after two weeks in the desert.
Tow-Behind RV (living space in a secondary vehicle towed by a car or truck such as 5th wheels, campers, and travel trailers)
Trailers can take advantage of the same charging opportunities as well, but require the ability to connect and disconnect quickly. After all, the whole point of using solar is to passively charge your batteries while you go out and play outside. Either of the DC to DC chargers mentioned above can be installed in the vehicle doing the towing, or in the trailer itself within close proximity to the house batteries. Just keep in mind that the longer the distance from the starting battery, the larger the gauge cable you will need to use to reduce voltage drop and increase safety. Many Renogy customers use Anderson 4 Gauge Extension Cables to make a quick and easy connection between the trailer and the towing vehicle.
Wiring Diagrams:
• DC to DC Battery Charger (manual, pg 16)
• Dual Input DC to DC Battery Charger (manual, pg 14)
We hope this list of blogs, videos, and diagrams has been helpful to you. Check back with us on this blog, because we will continue to try and improve it as we find more helpful information. If you have further questions, please don’t hesitate to contact us via our website or social media listed below. And, be sure to follow our solar powered journey!

Shari Galiardi & David Hutchison have turned their higher education backgrounds, desire for life-long learning, and thirst for adventure travel into writing, photography, video production, and public speaking tours from coast to coast. Known to their friends as simply Shari & Hutch, you can learn more about their full-time, solar powered adventures on their website at freedominacan.com. Or, follow them on Facebook, Instagram, and YouTube as “Freedom in a Can.”


