


This blog introduces how to properly set up a basic solar system, covering how to plug in and wire solar panels, how to hook up solar panels and connect solar panels to battery, and how to do solar panel wiring diagram.
System Set Up
|
NOTE
When setting up your system, the solar panels should be out of the sun or covered for safety reasons. |
Step 1: Hook up the battery to the charge controller.
Connect the battery terminal wires to the charge controller FIRST, then connect the solar panel(s) to the charge controller. For detailed reasons, see Should We Connect Batteries First Instead of Solar Panels to Charge Controllers?
You could use our tray cable or any general stranded copper core wire to connect the two. Make sure that you lead the wire into the battery terminal of the charge controller and match the + and – to the battery + and -. Make sure to screw in the exposed wire tightly inside the controller terminal. Then screw on the battery rings to the battery. See Figure 1.
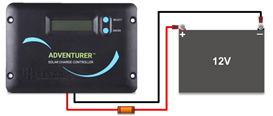
Figure 1
Step 2: Connect your solar panel to your charge controller.
We recommend that you connect the adapter kit to your panel first, then follow the + or – sign coming off of the leads of the panels and match it with the + and – sign on the charge controller. See Figure 2.
|
NOTE
Be careful at this step, because if the solar panel is inserted incorrectly, you can have reverse polarity and short the system causing damage to the panels or controllers. |

Figure 2
- For details on how to set up a single solar panel, see Renogy Single 100W Solar Panel Off-Grid Installation.
- For how to hook up solar panels specific to application and purpose, see Renogy Solar Panel Installation Manual.
Step 3: Hook up your inverter to your battery by using battery ring cables and by matching the + to + and – to -.
See Figure 3 for more installation instructions

Figure 3
Related Read:
- For details on how to set up your solar kit, see Renogy Off-Grid Kit General Manual.


