A Guide Between Series and Parallel Connections
Introduction
This section will go into more depth on series, parallel and series-parallel connections. The purpose of this section is to explain why certain connections are utilized, how to set up to your desired connection, as well as going over what is the most beneficial connection to utilize based on your situation.
Why Parallel?
Strictly parallel connections are mostly utilized in smaller, more basic systems, and usually with PWM Controllers, although they are exceptions. Connecting your panels in parallel will increase the amps and keep the voltage the same. This is often used in 12V systems with multiple panels as wiring 12V panels in parallel allows you to keep your charging capabilities 12V.
The downside to parallel systems is that high amperage is difficult to travel long distances without using very thick wires. Systems as high as 1000 Watts might end up outputting over 50 amps which is very difficult to transfer, especially in the systems were your panels are more than 10 feet from your controller, in which case you would have to go to 4 AWG or thicker which can be expensive in long run. Also, paralleling systems require extra equipment such as branch connectors or combiner box.
Why Series?
Strictly series connections are mostly utilized in smaller systems with an MPPT Controller. Connecting your panels in series will increase the voltage level and keep the amperage the same. The reason why series connections are utilized with MPPT controllers is that MPPT Controllers actually are able to accept a higher voltage input, and still be able to charge your 12V or more batteries. Renogy MPPT Controllers can accept 100 Volts input. The benefit of series is that it is easy to transfer over long distances. For example you can have 4 Renogy 100 Watt panels in series, run it 100 feet and only use a thin 14 gauge wire.
The downside to series systems is shading problems. When panels are wired in series, they all in a sense depend on each other. If one panel is shaded it will affect the whole string. This will not happen in a parallel connection.
Why Series-Parallel?
Solar Panel arrays are usually limited by one factor, the charge controller. Charge controllers are only designed to accept a certain amount of amperage and voltage. Often times for larger systems, in order to stay within those parameters of amperage and voltage, we have to be creative and utilize a series parallel connection. For this connection, a string is created by 2 or more panels in series. Then, an equal string needs to be created and paralleled. 4 panels in series needs to be parallel with another 4 panels in series or there will be some serious power loss. You can see more in the example below.
There isn’t really a downside to series-parallel connections. They are usually used when needed and other options are not available.
How to Set Up Your System in Parallel?
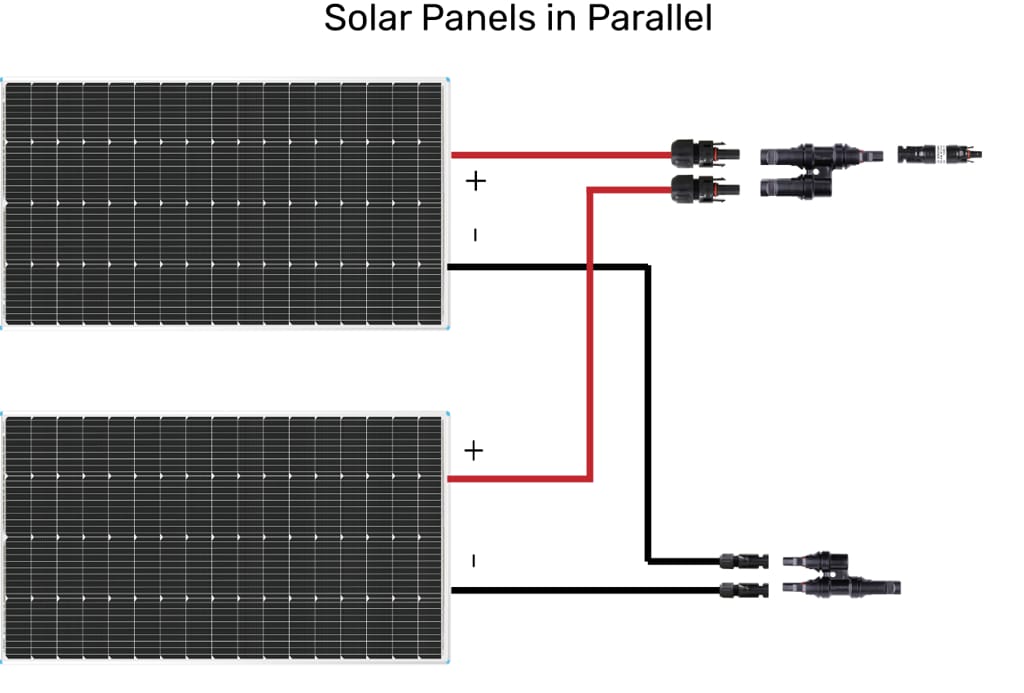
A Parallel connection is accomplished by joining the positives of two panels together, as well as the negatives of each panel together. This can be accomplished by different means, but usually for smaller systems this will be utilized via branch connector. The branch connector has a Y shape, and one has two inputs for positive, which changes to one, along with two inputs for negative, which changes for one. Please see picture below.

As you can see you have a slot for the negative terminal of panel #1 and the negative terminal of panel #2. As well as the positive equivalents. Then the negative out and the positive out will be utilized to connect to your charge controller via a solar PV cable.
Please see diagram below.

Let’s look at a numerical example. Say you have 2 x 100 Watt solar panels and a 12V battery bank. Since each panel is 12V and the battery bank you want to charge is 12V, then you need to parallel your system to keep the voltage the same. The operating voltage is 18.9V and the operating current is 5.29 amps. Paralleling the system would keep the voltage the same and increase the amps by the number of panels paralleled. In this case you have 5.29 Amps x 2 = 10.58 Amps. Voltage stays at 18.9 Volts. To check math you can do 10.58 amps x 18.9 volts = 199.96 Watts, or pretty much 200 Watts.
How to Set Up Your System in Series?
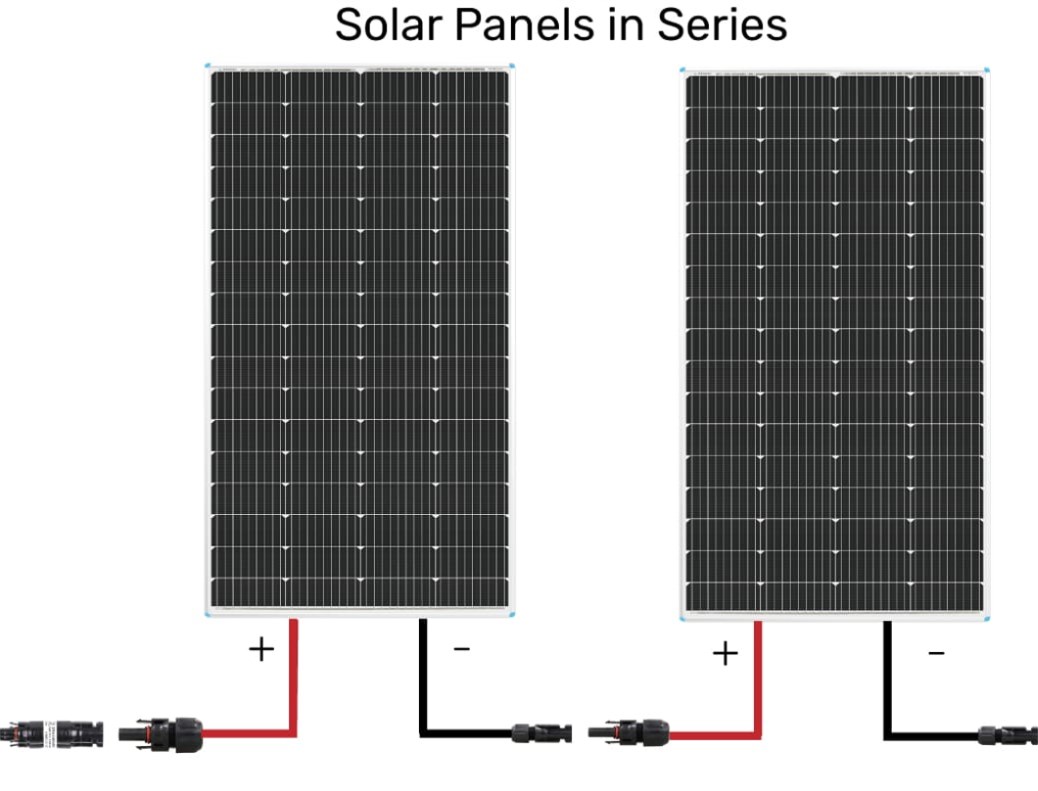
A Series connection is accomplished by joining the positive of one panel to the negative of the other panel together. With this you do not need any additional equipment except for the panel leads provided. Please see diagram below.

Let’s look at a numerical example. Say you have 2 x 100 Watt solar panels and a 24V battery bank. Since each panel is 12V and the battery bank you want to charge is 24V, then you need to series your system to increase the voltage. For safety, use the open circuit voltage to calculate series connections, in this case the 100 Watt panel has 22.5 Volts open circuit, and 5.29 amps. Connection in series would be 22.5 volts x 2 = 45 volts. Amps would stay at 5.29. The reason we use open circuit voltage is we have to account for the maximum input voltage of the charge controller.
*If you want to check math it won’t work with the open circuit voltage. You can use the operating voltage, so 18.9 volts x 2 = 37.8 volts. 37.8 volts x 5.29 amps = 199.96 Watts, or pretty much 200 Watts.
How to Set Up Your System in Series-Parallel?
A series-parallel connection is accomplished by using both a series and a parallel connection. Every time you group panels together in series, whether is 2, 4, 10, 100, etc. this is called a string. When doing a series-parallel connection, you are essentially paralleling 2 or more equal strings together.
Please see diagram below

As you can see this series parallel connection has 2 strings of 4 panels. The strings are paralleled together.
Let’s look at a numerical example for this diagram. This is mostly used on our Renogy 40 Amp MPPT Controller as it can accept up to 800 Watts of power, but only can accept 100 Volts in, which is why you cannot do everything in series. Paralleling 8 panels as well would cause too high of an amperage.
For this example, you would use the open circuit voltage of 22.5 Volts and the operating current of 5.29 Amps. Creating a string of 4 panels, you will have a voltage of 22.5 Volts x 4 = 90 volts, which is under the 100 Volt limit. Then by paralleling on the other string, the voltage will stay 90 volts and the amps will double, so 5.29 amps x 2 = 10.58 Amps.
* Keep in mind there is usually another factor that needs to be taken into account when sizing for the MPPT Controller called the boost current. This will be discussed in the charge controller section.
*If you want to check math it won’t work with the open circuit voltage. You can use the operating voltage, so 18.9 volts x 4 = 75.6 volts. 75.6 Volts x 10.58 amps = 799.85 Watts, or pretty much 800 Watts.
Related read:
Series, Parallel, and Series-Parallel Connections of Batteries
Setup Video Guide
How to connect your Solar Panels in Series and Parallel Part 1

How to connect your Solar Panels in Series and Parallel Part 2


