Renogy's REGO System Installation Tips, Product Review, & Score Card
Over the past couple of weeks, we’ve had fun coaching our friends, Jeremiah & Erin Steff, through the installation of a complete REGO system – one of Renogy’s latest innovations – on their 2021 Forest River “Wolf Pup” and 2020 Toyota Tacoma truck. We’ve helped them determine where to install the 5 major components, attach rigid solar panels on their roof, wire the system into the alternator (via starting battery) of their Toyota Tacoma truck, and integrate the REGO components into their existing RV electrical system. Check out the details of our installation, and learn more about this adventurous, young couple!
What is REGO?
REnogy on the GO (or REGO) is a complete system with all the components you’ll need to build out and/or integrate a solar powered system into your RV, van, motorhome, travel trailer, or 5th wheel. It comes with 5 major components, all wiring between components, all fuses, as well as a Renogy ONE – a comprehensive energy monitoring and smart home automation system. The only component missing from this kit is the solar panels that work best for your situation, vehicle, and usage. Check out stories from some of our favorite fellow solar road warriors for more information!
In a typical solar powered system installation, the integration of multiple battery charging methods can be a technical challenge – DC to DC chargers, converters, inverter chargers, etc. This usually requires a professional installer or someone with a higher level of electrical knowledge to properly fuse, and size electrical wiring. These days, installers can be booked up for months out – which can be very frustrating when you’re ready to hit the road.
With REGO, this issue is already solved! You’ll have 3 seamless ways to charge your battery – with up to 800W of Solar Panels (when the sun is shining), a 60A DC to DC Charger (while driving), and/or a 3000W Inverter Charger (when plugged into shore power). REGO’s 4 Port 400A System Combiner Box greatly simplifies the integration of multiple charging methods by serving as a “hub” to combine them into one system – with an easy click-to-connect Anderson connectors. It is designed for the newbie solar DIYer…and it’s brilliant!
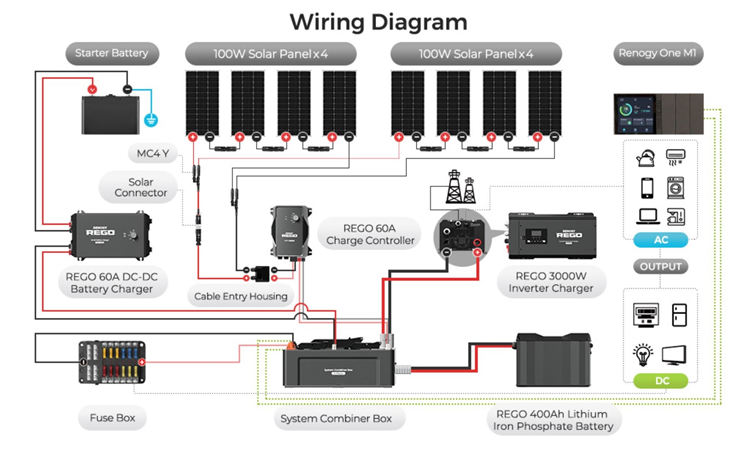
REGO Wiring Diagram
In addition to this system, you’ll need to purchase the appropriate number of solar panels based on your energy consumption and sun availability (up to 800W) as well as the appropriately-sized wiring and connections specific to the needs of YOUR vehicle(s). To give you an idea of additional costs beyond the REGO system, our friends spent about $1700 on 2 x 200W rigid panels, a 200W solar suitcase, and all the wiring, accessories, and switches needed to complete the entire installation.
Is REGO a Good Fit for YOU?
Are you…
-a solar newbie?
-interested in DIY but have limited time to research and complete an installation?
-seeking to simplify the wiring needed to integrate solar into a RV electrical system?
-completing a van, bus, or box truck build from the frame up?
-tired of waiting for a professional solar installer to be available in your area?
Do you…
-want to be able to seamlessly run both AC (120V) and DC (12V) appliances while boondocking or living off-grid?
-have moderate to high daily energy needs and run numerous electrical appliances at once? Click here to estimate your energy demands using our Solar Sizing Worksheet.
-travel in variable climates, sun availability, etc.?
-work from the road?
Meet the REGO Components
Here’s a brief run-down of all the components. You can find all technical specs and additional information on the Renogy website, but here are the basics. Note: While REGO is sold as a complete system, you can purchase any of the components separately and integrate them into an existing system.
- 12V-60A DC to DC Charger: Allows you to charge while driving or while your engine is running. It is connected to the alternator of your engine via your starting battery, whether you use a tow vehicle or have a van, bus, or motorhome. It takes some excess voltage that is created while the engine is running and increases it (up to 60A), which charges your REGO battery (or batteries).
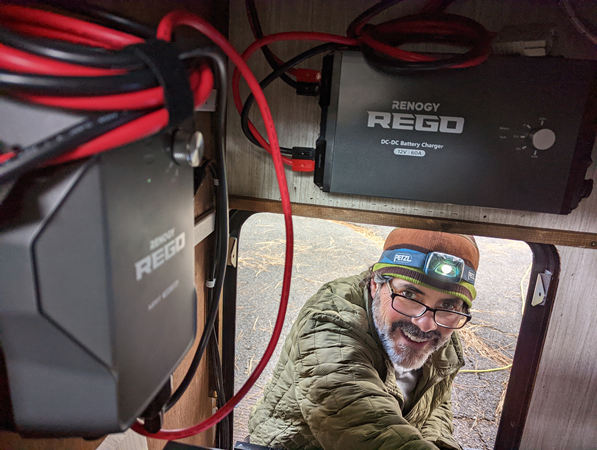
Hutch with REGO Components
- 12V-60A MPPT Solar Charge Controller: Monitors the energy coming in from your solar panels, allowing the battery to charge appropriately. With MPPT technology built-in, it takes any excess voltage coming from your panels and turns it into amperage (instead of just excess heat), allowing your battery to charge faster.
- 12V-400Ah Lithium Iron Phosphate Battery: Stores the energy coming in from any or all 3 energy sources: solar panels, while driving, or via shore power. It is equipped with built-in Bluetooth monitoring, self-heating function, and smart technology. The capacity of this battery (aka available watt hours) is equivalent to 4 x 100Ah Lithium Iron Phosphate batteries OR 8 x 100Ah AGM/Gel batteries, but only weighs 112 pounds and takes up 1.4 cubic feet. For sake of comparison, 8 x 100Ah AGM/Gel batteries weigh in at 512 pounds and take up 3.5 cubic feet, and 4 x 100Ah LFP batteries weigh in at 104 pounds and take up 1.3 cubic feet. If you care to expand this system beyond 400Ah, you may connect up to 8 REGO batteries in parallel using up to 3 400A 3 Port Battery Combiner Box(es).
-3000W Inverter Charger: Serves as both an inverter (altering DC battery power to household AC power) as well as battery charger when you are plugged into AC shore power. Whether on-grid or off, you can run your microwave, CPAP, hairdryer, coffee maker, small air conditioner, electric heater, TV, laptops, and any other 120V household appliances – up to a total load of 3000W, with up to 9000W of surge power.
-4 Port 400A System Combiner Box: Serves as the main brain of the system, by combining the energy generated by the 3 different energy sources mentioned above. All wiring meets at the combiner box to simplify the full integration into your RV or van’s electrical system.
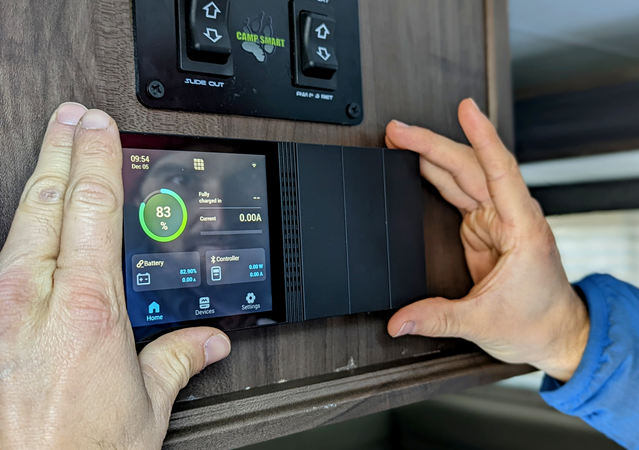
Renogy ONE installed
-Renogy ONE monitor with 1 year subscription: Monitors all components of your solar powered system, tracks energy production and usage, and allows you to integrate a smart home automation system. See our installation and basic set-up video of the Renogy ONE.
Approximate Installation Time
While the 5 major REGO components can be hooked up in less than an hour as all the wiring between components is supplied for you, and all connections are made with Anderson connectors (a simple “click together” connection), you’ll want to factor in the necessary time to integrate the system into your RV’s existing space/electrical system, wire your tow vehicle, and install solar panels. Check out our full video installation series for details about each step of the process.
After completing the installation of REGO on our friend’s 2021 Forest River “Wolf Pup” travel trailer, we’ve estimated the time needed to install the entire system. Check out our REGO Installation Video Series with step-by-step instructions. Note: You may need to double these estimates if you are a solar/electrical newbie!
1.Installing solar panels and associated wiring: 1 day, depending on the number of panels you plan to incorporate
2.Wiring to integrate the DC to DC charger into the engine of your tow vehicle (for trailers and 5th wheels), van, or motorhome: 4-5 hours
3.Finding and preparing the appropriate space for your REGO system: 1 day of measuring, demolition, or light construction
4.Installing the REGO components: 4-6 hours including some light construction and plugging in all wires from different sources
5.Wiring to integrate the REGO inverter charger into your RV Control Panel (i.e., pulling wire from the main breaker / busbar / fuse box to the Combiner Box and grounding): 4-6 hours, depending on the complexity and access to your electrical system
6.Integrating, wiring, and setting up the Renogy ONE monitoring system: 2-3 hours
Important Installation Considerations: Space, Weight, Ventilation, & Wiring
Space: Before the components arrived, we cut out cardboard 3D models of each component so that we could move them around in various orientations / configurations to see how they would fit into the space. This made it much easier to quickly assess installation options without having to move very heavy objects around more than once. We chose the compartment that housed their outdoor mini fridge, which they had already determined was wasted space as they never used it. Overall, the 5 components take up about 12 cubic feet of space, including appropriate ventilation space and wiring with Anderson connectors. Our cabinet was 35”H x 27”W x 23”D and turned out to be the perfect fit for the system. Additionally, it happened to be where the old battery cutoff cables were located, which we were able to use to connect the new REGO battery to the DC system.
Weight: To maximize space in the compartment, we chose to install the 112 pound battery directly on the floor and elevate the lighter combiner box above it on a shelf. We were also able to elevate the inverter charger, giving it the appropriate ventilation space required for safe operation.
Ventilation: The inverter charger, charge controller, and DC to DC charger all need adequate ventilation to prevent overheating. Carefully read the Quick Guide booklets for each component before installation to give each of these components some breathing room.
Wiring: While the provided wiring (all with attached Anderson Connectors) is extremely helpful and removes the guesswork and fiddly challenges associated with wiring the components together, they do take up a good deal of space, so make sure you have plenty of room above and around each component so that all components and their wiring fit into the planned space.
Our REGO Score Card
Ease of Installation: 9
This system is well thought out and once you decide on a space where it will fit into your vehicle, it takes less than an hour to connect all the components together. As mentioned earlier, there is some additional wiring time and skill needed to properly wire the solar panels and inverter charger. Overall, very easy for a solar DIY newbie to do!
Component Integration: 10
The 4 Port System Combiner Box (with all wiring between components and fuses provided) eliminates all the guesswork, which makes it safer and more efficient. Integration is seamless, practically a no-brainer!
Charging Options: 10
With 3 different charging methods, all seamlessly integrated together through the 4 Port System Combiner Box, you can’t ask for more. This system is a road warrior's dream!
DC to DC Performance: 9
At idle, we were able to pull 26A from the truck’s alternator. We expect that this number will be closer to 50+A while driving which will charge the battery from 20% to 100% in about 6 hours. Keep in mind that if you have solar gain while driving, your charging time will be greatly reduced with two power sources combined. Jeremiah and Erin, have not been able to road test it yet as it’s full-on winter here in Bend, OR, but we’ll report back with data when they head out on their first trip!
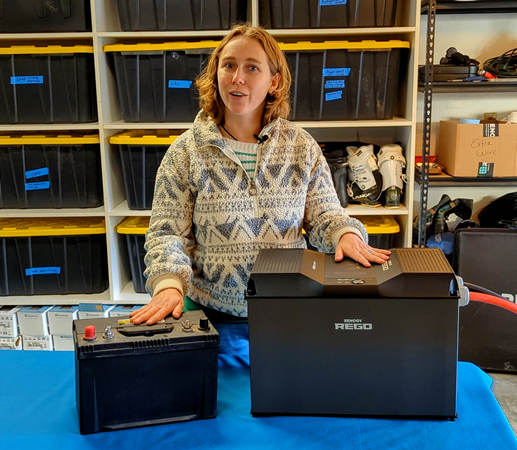
Erin Comparing Batteries
Battery Capacity & Performance: 10
This single LFP battery will provide 3840WH per cycle (at a safe 80% depth of discharge), and up to 300A of maximum continuous charging current – allowing the battery to recharge very quickly from multiple sources. At 3840WH, this stored energy will provide most people all the power they could possibly need to boondock off-grid for many days of low solar gain without needing to run the truck’s engine or a gas-powered generator. We tested numerous appliances for many hours and had a difficult time running the battery down. In addition to built-in Bluetooth technology, this battery has a self-heating function which kicks in when the core temperature of the battery drops below 41 degrees Fahrenheit – allowing for seamless, effortless charging in real winter temps! For comparison sake, check out our recent article which provides a comprehensive overview of the specs of many Renogy’s battery options.
Inverter Performance: 9
We tested numerous high wattage appliances, such as an electric kettle, instant pot, microwave, hair dryer, electric heater, blender, and shop vac, to see if we could max out the inverter’s capacity. With a rating of 3000W (and a peak surge of 9000W), we could easily run 3-4 high wattage appliances at once without the inverter shutting down. This system should be able to run their A/C unit for at least a couple of hours, more if running with full sun on the panels.
System Monitoring: 10
The Renogy ONE makes monitoring the entire system a snap. Once you have installed and paired your Renogy ONE to the DC Home app, you are able to see all components at once and dive into the details of each component with a few clicks on the touch screen. Also, if you are away from your camper (and your camper has a wifi enabled device which can talk to the Renogy ONE), you can monitor the components from afar using the DC Home app on your smartphone. Jeremiah and Erin plan to add some smart home automation features to their Renogy ONE in the future, such as window and door sensors or the ability to turn A/C appliances on and off while they are away.
This monitor is easy to install and simply needs to be wired into any 12V DC power source within your RV or van. Since we mounted it underneath their RV’s “One Control” unit near the door, we powered the Renogy ONE by tapping it into the positive and neutral terminals on this existing unit.
Design & Construction: 10
While installing the components, everything seems solidly built with almost “dummy proof” labels, connections, dials, buttons, and switches. The wiring between components simply couldn’t be more straightforward and easy to install with provided wiring and Anderson connectors. The fact that the battery is waterproof gives us added confidence with installing it on the floor within proximity to the kitchen.
Warranty: 10
5 full years on all components! While this system will likely last a lifetime, 5 years is an awesome warranty y’all…thanks Renogy!
Price: 10
The price of this system may cause some sticker shock if you are new to solar. But, when you compare this price to building an equivalent quality system from scratch (including purchasing all the equipment, necessary wiring & cabling, fuses, and switches), and paying for someone to install it, you are likely way over this price. With REGO, you’ll have a robust system which is designed to work seamlessly and safely…and you can do it yourself!
Final food for thought…if you plan to hit the road full-time and stay at a campground with electrical hook-ups every night, you’ll spend $40 - $80 per night x 365 days = $14,600 - $29,200 in one year, which is 2-4x what this system costs. And, REGO is designed to last more than 10 years!
Overall Score: 97/100!
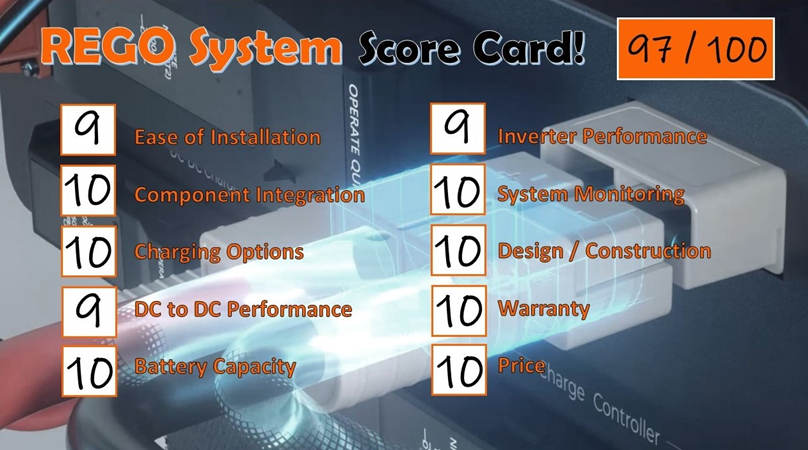
REGO Score Card
Plug & Play!
Since their founding, Renogy has focused on making solar components that easily sink with each other so that you can have confidence in your solar power installation. REGO offers the latest iteration of this goal and helps the new solar DIYer take some of the guesswork out of their build. With robust components and easy opportunities for expansion, REGO is a great place to begin your project. Let’s get started…

Shari & Hutch
In 2012, Shari Galiardi & David Hutchison left behind careers and a comfortable home in North Carolina to travel with the vintage camper trailer they lovingly restored, outfitted with solar, and named "Hamlet." What began as a short break from careers and responsibility quickly turned into a love affair with roadlife. They have parlayed their higher education backgrounds, desire for life-long learning, and thirst for adventure travel into writing, photography, video production, and public speaking gigs from coast to coast. Known to their friends as simply Shari & Hutch, you can learn more about their full-time, solar-powered adventures on their website at freedominacan.com. Or, follow them on Facebook, Instagram, and YouTube as “Freedom in a Can, LLC.”


