Do you need a solar charge controller for RV?

A solar charge controller is an essential component for your RV if you plan to install any type of solar panel array using flexible or rigid panels, or even if you use a folding solar suitcase or portable panel. There are so many options on the market that deciphering the unique differences is enough to make your head spin if you are new to solar! We’ve installed and used various charge controllers in different systems over the past 10 years of living on the road. This blog is designed to assist you with thinking through the various considerations to choose the best solar charge controller for an RV.
Table of contents:
- Do you need a solar charge controller for an RV?
- What does a charge controller do?
- What size of charge controller do I need for my solar panel array?
- How do you size a solar charge controller for an RV?
- How to wire an RV solar charge controller?
- What should I look for when buying a solar charge controller for my RV?
Do you need a solar charge controller for an RV?
The simple answer is yes, but selecting an appropriately-sized RV solar charge controller based on the size/type of the solar array and battery bank you plan to install is key to both the safety of your system as well as your satisfaction with its performance. Below are 4 important questions to consider in order to select the appropriate charge controller:
1.What is the TOTAL wattage of your solar panel array?
Multiply the number of panels you will be using by the wattage of each panel. This total number (output) will play a role in determining the size of the charge controller needed for your system.
2.Will you be connecting your panel array using parallel OR series wiring?
Your wiring scheme makes a big difference as it either increases the voltage (for series connections) or increases the amperage (for parallel connections) of the system. Determining the optimum operating voltage and amperage of your solar array is an important part of sizing a charge controller appropriately.
3.Will you be connecting your charge controller to lead acid batteries (flooded, Gel, or AGM) OR Lithium Iron Phosphate? Different charge controllers are designed to work with the different chemistry (and thus different charging parameters) of deep cycle batteries. While many modern controllers offer compatibility with most battery types, it’s always good to check the specs!
4.What is the voltage of your battery bank (12V, 24V, 36V, or 48V)?
Charge controllers are designed to handle different battery bank voltages. Most Renogy charge controllers can handle 12V and 24V (and a few can handle 36V and 48V), but it’s always good to confirm the range of voltages with which each charge controller is compatible if you are building a larger-than-average system. This blog- 12V, 24V, Or 48V Solar Power System: Which Voltage Is Best For Your Situation? will walk you through the details of building larger voltage systems.
What does a charge controller do?
A charge controller is an essential part of any solar powered system as it serves as the “brain” situated between your solar panels (array) and your battery bank. It senses when the panels are producing an electrical current AND when the battery bank needs to be charged, thus regulating the flow of energy between the solar array and battery bank.
There are two types of change controllers: PWM and MPPT. In 2021, we augmented our overall system on our vintage camper "Hamlet" so that we could more effectively run a mobile business, and upgraded from a Wanderer Li 30A (PWM) to a Rover Elite 40A (MPPT). While it is important to understand the difference between these two types, we’ll cut to the chase. MPPT chargers are designed for larger, more complex systems and are a bit more expensive, BUT they increase the overall efficiency of your system by up to 40% as they take advantage of some excess voltage coming in from your solar array and turn it into amperage to charge your battery bank faster. Do we think they are worth an extra $100-$150? Absolutely!
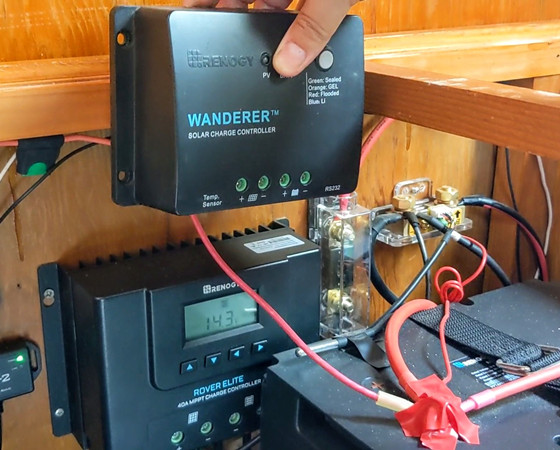
Comparing Wanderer with Rover Elite
PWM Options: Adventurer, Voyager, & Wanderer Series
MPPT Options: Rover Series, REGO Series
Can I connect a solar panel directly to a battery without a charge controller?
No, this can damage your battery bank and potentially cause a fire. The only exception is for very small panels which produce 5 watts or less. Solar panels themselves just produce power (and thus heat), but have no way of regulating the amount of energy they produce. Connecting solar panels directly to a battery bank without a charge controller regulating the flow of energy would be like continuously running a heater without any sort of thermostat. The heater would keep running, overheat, and potentially cause a fire and damage the equipment and your home. So, while charge controllers are the least expensive component within a solar powered system, they play a crucial role in protecting your equipment from damage or failure, so don’t skip this component!
What size of charge controller do I need for my solar panel array?
Since a charge controller is situated between your solar array and your battery bank, it needs to be compatible with both sides of the wiring “equation.” Its size and compatibility depends on 1) the total wattage (output) of your solar array, 2) how you intend to wire the panels (parallel vs. series), 3) the type of battery chemistry (lead acid or lithium iron phosphate), and 4) the total voltage (12V, 24V, 36V, 48V) of the battery bank you plan to install.
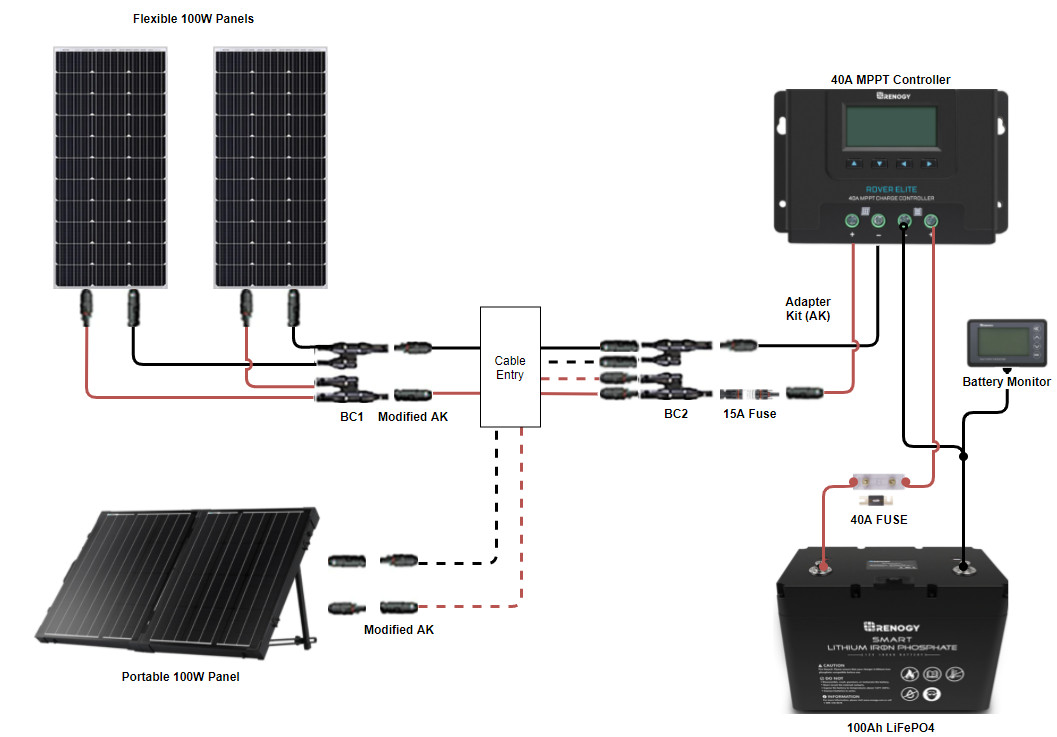
Basic charge controller wiring diagram
How do you size a solar charge controller for an RV?
If you are building a system from the ground up, rather than purchasing a solar kit which comes with a recommended charge controller, it’s important to understand some electrical terminology. To determine the best solar charge controller for your RV, you will need to dive into some basic math and physics to assess compatibility.
Let’s start with the solar array side of the equation. We want to point out that solar panels are often labeled as “12V panels” which refers to their “nominal voltage” (i.e., in name only). The actual operating voltage is much higher than their nominal voltage suggests. This is an intentional design so that panels still operate at a minimum voltage to charge a 12V battery under low light (and thus low voltage) conditions.
Specs for panels are rated using “optimum operating voltage” and “optimum operating amperage (aka current)” to specify the maximum output for each panel. These numbers are the volts (V) and amps (A) that a solitary solar panel can produce in real world conditions in the full sun. The numbers below are taken from the specs for various Renogy rigid panels using optimum voltage and optimum amperage, respectively. Note: While 100W and 200W panels are commonly used on RV’s, 320W, 450W, and 550W panels are typically used for larger applications; but, any panels can be used on any rooftop if they fit the space allowed.
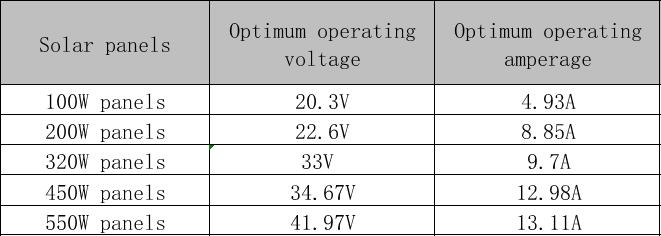
The following chart illustrates some common RV configurations using various panel arrays of either 100W or 200W panels (in both series and parallel), as well as the size of RV solar charge controller you will need to safely and effectively run the system. For sake of simplicity and safety, we have rounded these numbers up to an integer. For example, 20.3V gets rounded to 21V.
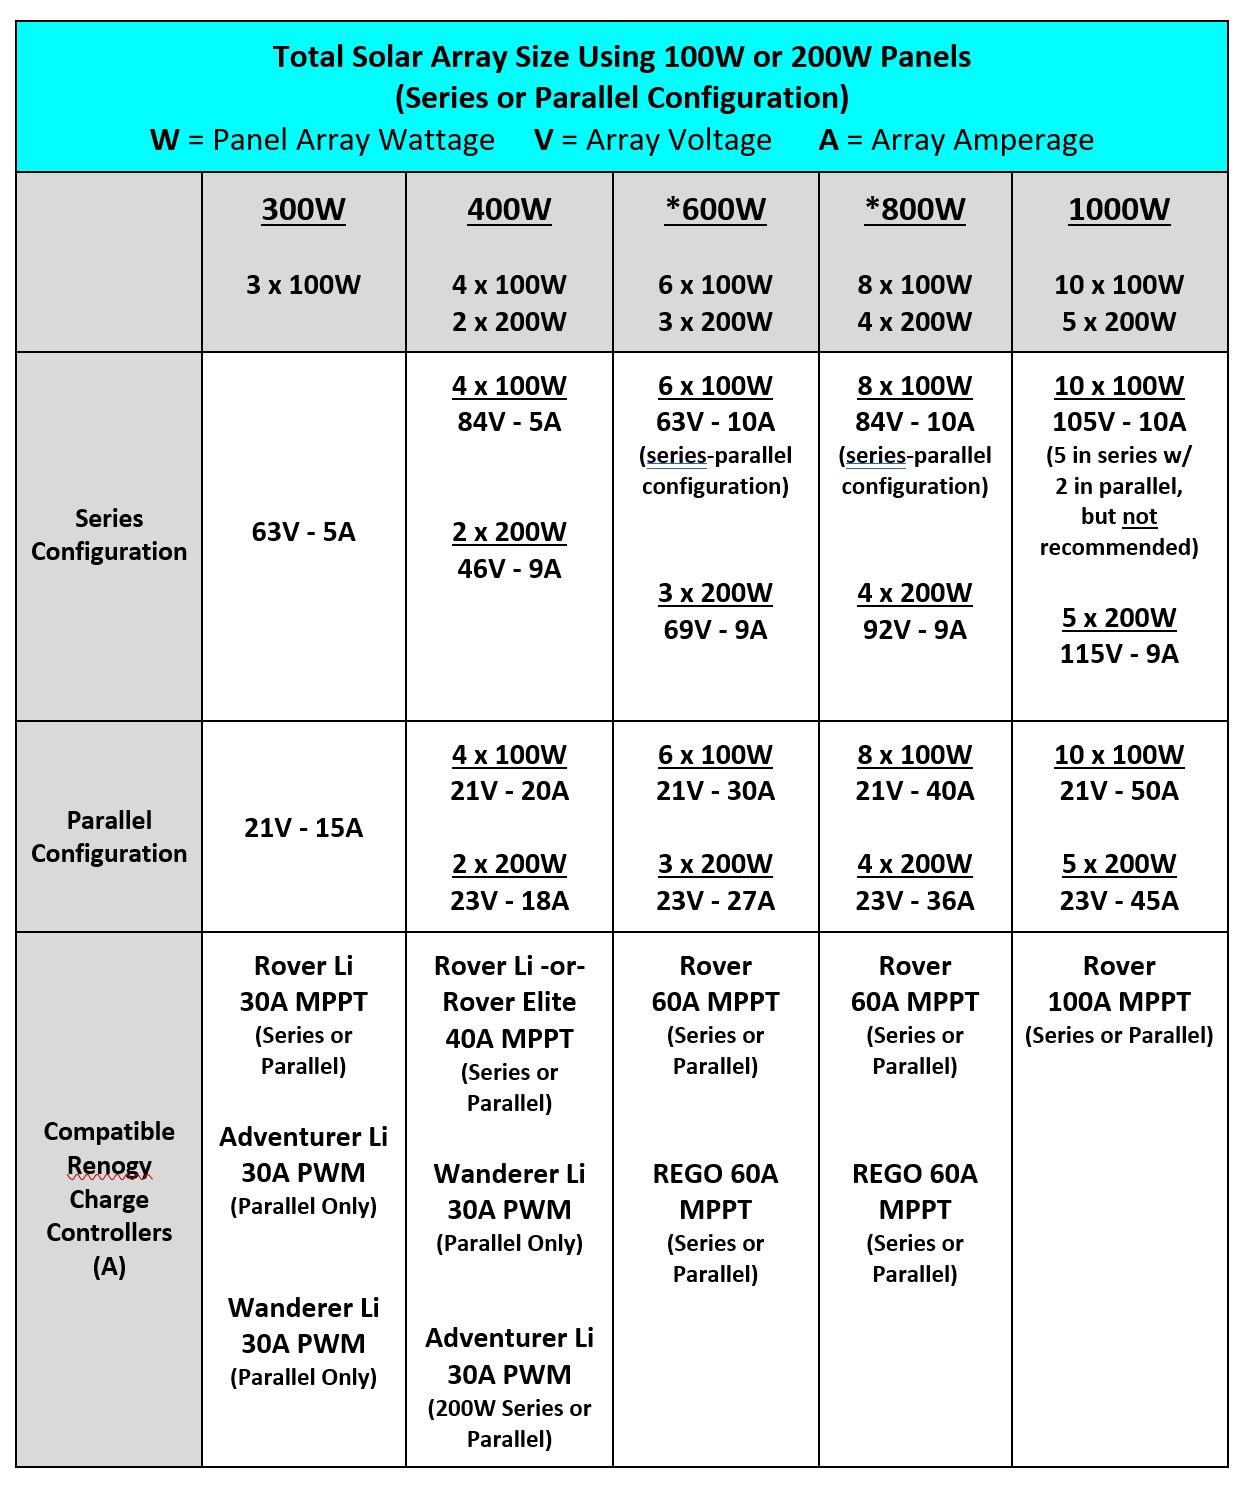
Solar Array Chart with Recommended Charge Controller
*Note: For 600W and 800W arrays using 100W panels, you can combine a series-parallel configuration. See below for more details.
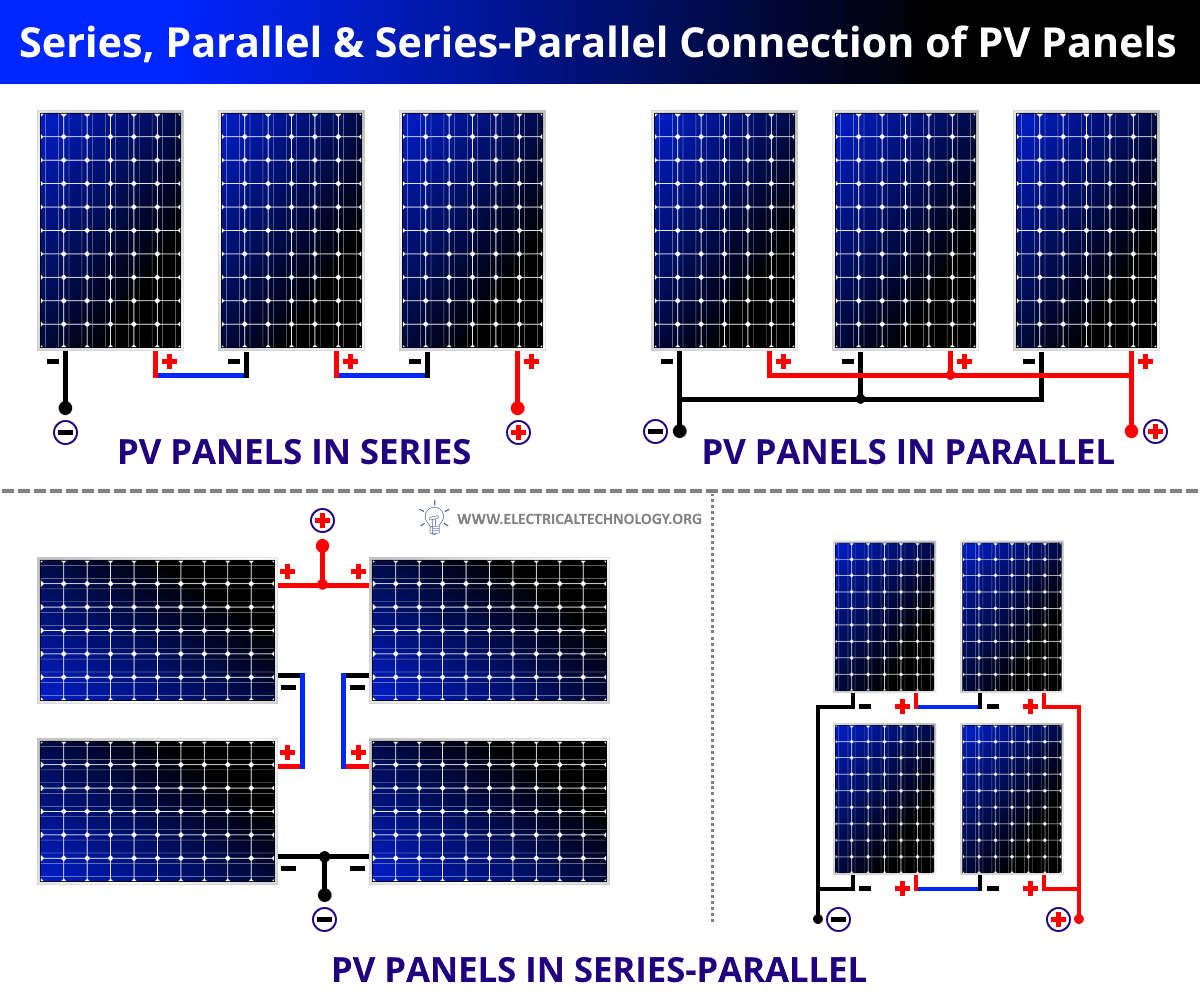
Parallel vs Series Wiring Configuration
To determine the best solar charge controller for your RV’s system, use the maximum amperage (optimum operating amperage) of your solar array and multiply it by 1.25% to get a safe margin of error. Let’s use the 600W example in the chart above. Your 600W solar array (wired in parallel using 3 x 200W panels) can produce up to 27A. Since 27 x 1.25% = 34, you’ll need to purchase a charge controller that can handle up to 34A. Then, you’ll want to make sure that the charge controller is designed to handle both the operating voltage (23V) coming in from the panels as well as the total 600W coming in from your panels. Let’s examine the specs of both the Rover Elite 40A MPPT and Rover 60A MPPT to see which one is best.
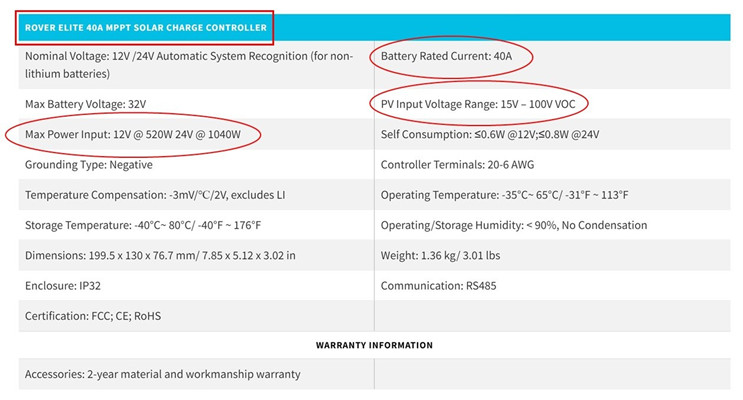
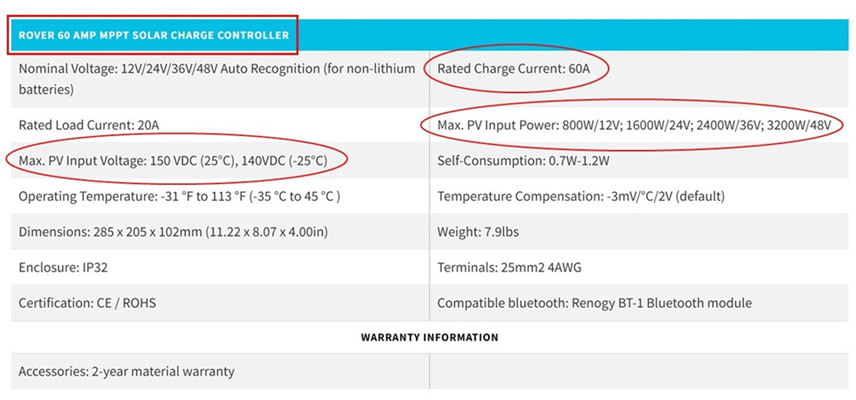
Specs for both charge controllers
At first glance, it appears that the Rover Elite 40A will do the trick as it can handle a 40A charge current and maximum PV input voltage up to 100V, but it can only support a maximum PV input power (solar array) of up to 520W at 12V. So, it’s not large enough for this system. On the other hand, the Rover 60A can handle a 60A charge current and maximum PV input voltage up to 150V, as well as a maximum PV input power (solar array) up to 800W at 12V, so the larger 60A Rover charge controller is going to be more than adequate for this system. This blog-Solar Charge Controller Sizing And How To Choose One provides further detail, as well as specific charge controller recommendations as they apply to the specs and numbers we’ve discussed above.
*Can I Combine a Series & Parallel Configuration?
Yes! Another way to reduce high voltage loads, as well as the size of your charge controller, is by combining your solar panel configuration methods. Let’s take an 800W solar array made up of 8 x 100W solar panels as an example. If you set up 8 panels in series, you end up with 162V - 5A, which is beyond the voltage parameters of most charge controllers appropriate for an 800W array. But, if you set up 4 panels in series (yielding an output of 81V - 5A), then combine 2 strings of 4 panels in parallel, you’ll achieve an output of 81V - 10A, allowing you to use a Rover 60A MPPT charge controller. This means that you can avoid the limitations of just using one configuration method alone. The diagram below for the Renogy REGO System below illustrates this configuration method for an 800W array.
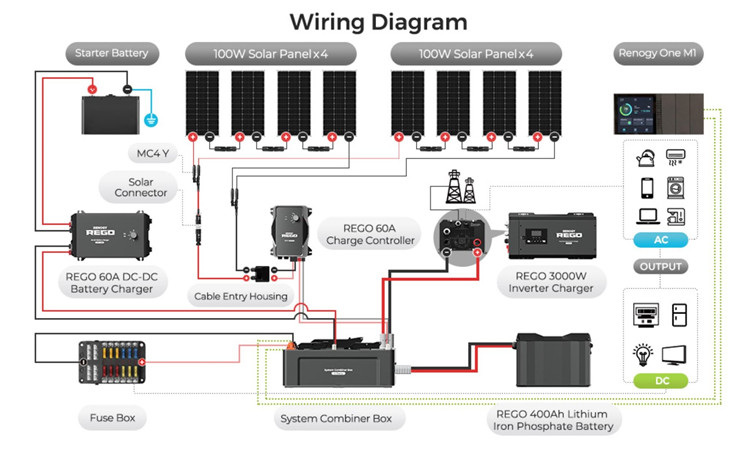
REGO diagram with Series-Parallel Configuration
Now, let’s look at the battery side of the equation. Various deep cycle batteries have different chemistry and therefore different charging parameters – and charge controllers are designed with these specific parameters in mind. Currently, all of Renogy’s MPPT and PWM charge controllers are compatible with both lead acid and Lithium Iron Phosphate batteries, though it’s important to note that the user needs to set the charge controller to the correct battery type when setting up the system. Some charge controllers are also equipped with battery voltage detection, making them compatible with different system voltages. If you are building a 36V or 48V system, check the specs of the charge controller to make sure it is compatible.
How to wire an RV solar charge controller?
Location & Ventilation
Before wiring up your charge controller, you’ll want to decide exactly where it is going to be located. Since charge controllers can heat up during use, good ventilation is required so they do not overheat. Each installation has parameters specific to the charge controller’s size and power, so it’s important to read the user’s manual for space recommendations before purchasing your unit.
Wiring
Choosing the correct gauge of wire (measured in AWG) is the trickiest part of safely wiring a charge controller between the solar array and battery bank.
Step 1: Determine the length of the wire running from the panels to the charge controller, as well as the possible amps running through those wires in order to determine the appropriate wire gauge. Then, do the same calculations for the wiring running from the charge controller into the battery bank. Use the standard chart below to determine the proper gauge wires for your system.
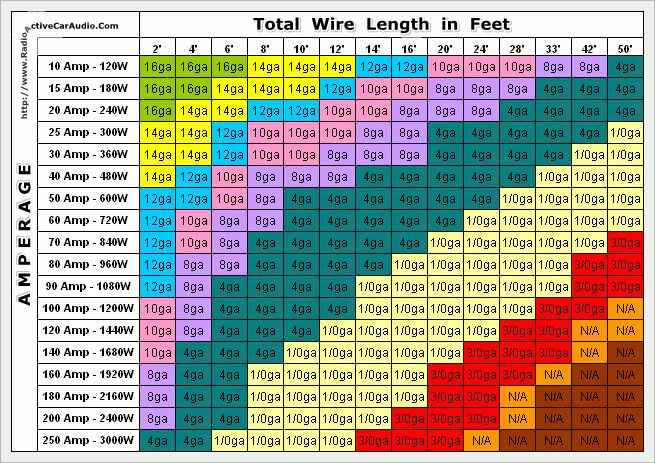
AWG wiring chart
Step 2: You’ll also need to consider appropriately-sized fuses on either side of the charge controller to further protect the wires and components. Renogy makes MC-4 connector in-line fuses in various sizes that easily connect to the branch connectors just downstream of your solar panel configurations, thus protecting the wire run from your solar panels to your charge controller.
To determine the appropriate-size fuse between your solar array and charge controller, take the number of amps coming from the solar panels and add 10A for a margin of safety.
To determine the size fuse between the charge controller and the battery, simply match the amperage rating on the charge controller.
Step 3: After you’ve determined the length and gauge of wire you’ll need, the easiest part is wiring up the charge controller. Charge controllers have an input side (where 2 wires come in from the solar array) and an output side (where 2 wires go out to the battery bank). Note: It’s very important to wire the output side to the battery BEFORE wiring the input side.
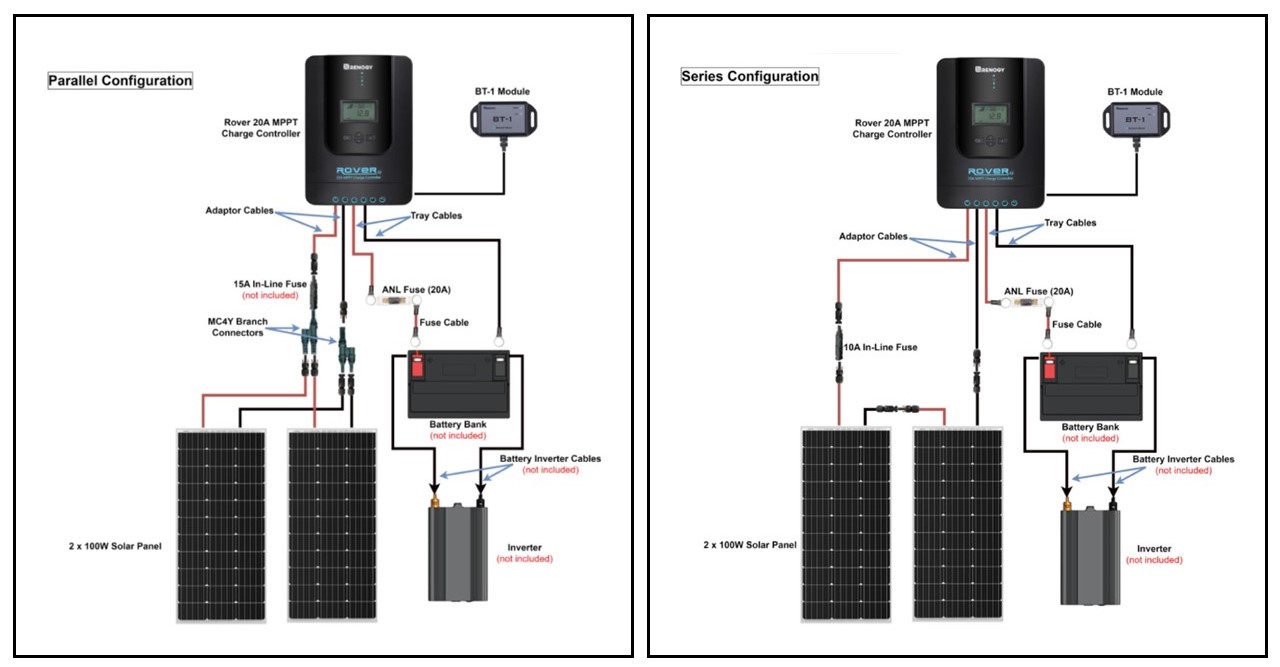
Side-by-Side Parallel vs Series Wiring Diagram
Identify the red/positive (+) and black/negative (-) on both the input and the output of the charge controller and insert the stripped wires into the correct terminal, making sure to screw them down securely so that they don’t wiggle out while driving down the road. To maximize stranded wire contact with the terminal and minimize the potential for a wire coming loose, consider using a wire end ferrule – a crimp on wire terminal that tidies up the stranded wire and is then inserted into the charge controller. Many installers swear by these connections.
Step 4: If your charge controller comes with a grounding post, add a grounding wire from the charge controller to the common ground on your vehicle.
For more detail, refer to “How To Wire A Solar Charge Controller In A DIY Camper Van” by asobolife.com for a thorough explanation of how to wire a charge controller and/or watch this video we made when we installed a Renogy Rover Elite 40A into our system.
What should I look for when buying a solar charge controller for my RV?
Below are some questions to ask yourself to make sure you get the best solar charge controller for your RV’s system.
Type (PWM vs MPPT)
What’s the best type for the system I’m building?
Small, simple = PWM
Large, complex = MPPT
Compatibility with my Solar Array & Battery Bank
Maximum PV Input Voltage: Is it rated for/above my total array voltage?
Rated Charge Current (amps): Is it rated at least 1.25% above the total possible current produced by my array?
Maximum PV Input Power (watts): Is it rated at/above my total array wattage in relation to my array voltage (12V-48V)?
Chemistry & Voltage of Battery Bank: Is it compatible with my battery bank chemistry (flooded, AGM, Gel, LFP) and voltage (12V-48V)?
Quality & Features:
Overall Size: Will the dimensions of the charge controller and associated wiring fit into the allocated space with enough ventilation room (check the specs!) for the controller as well as the other components which need ventilation (e.g., inverter)?
Plastic Casing: Does the plastic look and feel sturdy and durable?
Heat Sink Size: Is the heat sink sized appropriately for the controller? Does it get too hot when the solar array is fully illuminated? (warm is normal)
Temperature Sensor: Does the controller have a temperature sensor to increase efficiency with lead acid battery banks?
Indicator Lights: Are the lights easy to read/understand?
LCD Screen vs No Screen: Am I going to place my controller in a location where I need a screen, or does it have the ability to connect to Bluetooth instead?
Input Terminal Size: Are the input terminals large enough to accept heavier gauge wire (6-8 AWG)?
User Manual: Is the user manual easy to read/follow and does it include troubleshooting information?
Price: Is the price commensurate with the quality of the component?
Warranty: For how long is the component covered if it fails to work?
Reviews: What feedback do users have about their charge controller in real world conditions?
From our personal experience as full-time RVers, Renogy’s charge controllers are competitively priced and are as powerful as their counterparts. Over the past few years, we’ve used a variety of Renogy charge controllers (both PWM and MPPT) in different applications and have found them to be easy to set-up and monitor with Renogy’s BT module combined with the DC Home App and/or Renogy ONE monitor. Overall, our Renogy solar powered system provides us with all the power we need to live our mobile lifestyle!

In 2012, Shari Galiardi & David Hutchison left behind careers and a comfortable home in North Carolina to travel with the vintage camper trailer they lovingly restored, outfitted with solar, and named "Hamlet." What began as a short break from careers and responsibility quickly turned into a love affair with roadlife. They have parlayed their higher education backgrounds, desire for life-long learning, and thirst for adventure travel into writing, photography, video production, and public speaking gigs from coast to coast. Known to their friends as simply Shari & Hutch, you can learn more about their full-time, solar-powered adventures on their website at freedominacan.com. Or, follow them on Facebook, Instagram, and YouTube as “Freedom in a Can, LLC.”
Related articles:
What Does A DC To DC Battery Charger Do?
What To Know About MPPT Solar Charge Controllers
What Is The Difference Between MPPT And PWM Charge Controllers?


